

The monumental scale of Hadrian’s Wall has placed it at the forefront of debate about whether Rome’s frontiers imposed uniform restrictions on cross-border movement. Specialists interrogating the purpose of Hadrian’s Wall can be broadly divided into two camps: those who see it as a product of a consistent pan-Roman-World strategy, and those who judge its fabric to be evidently excessive in comparison to its peers. These two viewpoints have generated competing visions of the frontier, which can be crudely characterised as amounting to the difference between a defensible military stop-line designed to repulse a barbarian invasion, and a bureaucratic barrier concerned with regulating the peaceful movement of people. According to this latter school of thought, the scale of Hadrian’s Wall tells us more about the ego of its progenitor, the eponymous emperor, than the nature of any threat. The Romans themselves were consistently coy about the scope of their borders, and the only contemporary allusion to the purpose of Hadrian’s Wall is found in the fourth-century Historia Augusta. It discloses that Hadrian ‘was the first to build a wall, 80 miles long, to separate [divideret] the Romans from the barbarians’ (Hadrian 11, 2). A model of brevity, what precisely is meant in this context by the terms ‘Roman’, ‘barbarian’, and, especially, ‘separate’ remains contested.
Establishing the intention behind and impact of Hadrian’s Wall requires consideration of not only the second-century military infrastructure, but also the local population, the wider landscape context, and a more expansive chronological span. After all, the Wall arose from a combination of political and military circumstances that were peculiar to Britain, and which presumably informed the nature of the resulting frontier system. Furthermore, once work commenced on constructing the border fabric it must have begun to influence the subsequent development of the region. The imposition of a barrier that divided populated and previously open country, coupled with a surge in military personnel, would have triggered consequences both expected and unexpected. As the situation evolved, so too Hadrian’s Wall ought to have been adapted to meet the changed circumstances on the ground. To a degree this is borne out by the archaeological evidence, which suggests that far from operating in a uniform fashion for c. 270 years, Hadrian’s Wall was a dynamic system capable of responding to new political and military imperatives from both sides of the border. In order to determine the role of soldiers serving in fortlets – milecastles – and towers – turrets – along Hadrian’s Wall, this chapter discusses the events that triggered its erection, the rationale behind its convoluted building programme, and the subsequent development of the frontier.
The Build-up to Hadrian’s Wall
The popular perception of the circumstances leading up to the construction of Hadrian’s Wall is that the Roman army advanced to the Tyne–Solway isthmus, or even the modern Anglo-Scottish border, and elected to build a frontier. As we have seen, the true backdrop comprised Rome conceding the military initiative in the north. Rather than Hadrian’s Wall being commissioned following a period of successful advance, it emerged after a decade and a half of stasis following a protracted retreat from southern Scotland. The period between the recall of Agricola in AD 83 or 84 and the founding of Hadrian’s Wall has been described as ‘amongst the most obscure in the history of Roman Britain’ (Breeze and Dobson Reference Breeze and Dobson2000, 12), and it is evident that for much of that span Britain was devoid of opportunities for ancient authors to flatter an emperor’s martial prowess. If we take Tacitus and the implications of the glen forts on the Highland fringe at face value, it appears that the mid 80s saw the Roman army preparing to administer the coup de grâce in the aftermath of a decisive victory at Mons Graupius. Regardless of how straightforward occupying the Highlands would have proven in practice, it seems certain that the immediate effect of withdrawing the II Adiutrix in c. 87 was to plunge an army preparing for advance into retreat. Tacitus’s acerbic aside that ‘Britain was conquered and immediately abandoned’ (Histories 1, 2), may not be just an expression of filial loyalty to Agricola. It is entirely conceivable that this summed up the attitude of both the elite in Rome, and the soldiers caught up in the ensuing debacle.
It is difficult to reconstruct the fine detail of the retreat from Scotland, but various inferences can be derived from our broad-brush understanding of how events unfolded. The most salient is that although the army immediately appreciated that the redeployment of manpower to the Danube made further advance in Britain untenable, there is no indication that this setback was equated with a need to relinquish Scotland entirely. Instead, all known installations north of the Tweed appear to have been evacuated in an orderly fashion, and the fort at Newstead became the anchor of a new outer line (Bidwell and Hodgson Reference Bidwell and Hodgson2009, 13). The army conceivably assumed they only needed to hold this territory until the II Adiutrix returned and offensive operations could resume. Whatever the intention, this gambit suggests an ambition to retain southern Scotland, which ultimately proved unattainable. Further soldiers were temporarily siphoned away from Britain during Trajan’s Dacian wars, but the increasingly shallow manpower pool would presumably only have forced further withdrawal if pressure was actively being applied (Hodgson Reference Hodgson, Ochoa and Díaz2005a, 17). Foreign foes periodically inflicted severe reverses on Roman armies during the first century AD, but in the west such setbacks were typically incurred in ambushes or during the throes of regional insurrection. Defeat in individual actions could result in territory being surrendered, most famously in the aftermath of the AD 9 Varus disaster, but such incidents are of a different character to the spectacle of a Roman occupying force being incrementally rolled back. If the relentless Flavian advance through northern Britain had lent an aura of inevitability to Roman occupation, its immolation surely exposed the limitations of imperial power.
It is conceivable that the consequences of the dramatic decrease in manpower available to the army in Britain were aggravated by the shallow foundations of an advance that had gone too far, too fast. Tentative indications that pockets of territory were left unpacified and some roads remained unmetalled for decades after a region’s initial conquest paint a picture in which aggressive expansion trumped the less glamorous work of installing supporting infrastructure. Such matters may have appeared a distraction while the army was enjoying success in the field, although Tacitus’s Agricola (22; 23) certainly advocates undertaking the nuts and bolts of building a sustainable occupation. The army’s actions following its withdrawal by c. 105 to the natural bottleneck of the Tyne–Solway isthmus may be telling. Indications of an attempt to broaden the military presence in the southern hinterland of the isthmus would fit with a new determination to tighten control of a region that had been overrun c. 30 years previously. Several roads in the military zone may have received a hard standing at around this time, while a wide-ranging programme of infrastructure improvements would fit with the earliest datable milestone from Roman Britain, found on the Fosse Way near Thurmaston, being erected in 119 or 120 (see Poulter Reference Poulter1998; Cool and Mason Reference Cool and Mason2008, 96; Bidwell and Hodgson Reference Bidwell and Hodgson2009, 13; Millett Reference Millett, Halkon, Millett and Woodhouse2015, 553; RIB 2244). Despite this focus on resolving basic logistical and security concerns, the burgeoning military presence and concomitant pressure on land and resources may well have exacerbated tensions with local communities on the Tyne–Solway isthmus.
Several sources indicate that areas of Britain were in a febrile state during Hadrian’s reign. The Historia Augusta states that at the time of Hadrian’s accession in 117 ‘the Britons could not be kept under Roman control’, while Cornelius Fronto reminded the Emperor Marcus Aurelius that ‘when your grandfather Hadrian held imperial power, what great numbers of soldiers were killed by the Jews, what great numbers by the British’ (Hadrian 5, 2; Parthian War 2, 22). Whether these statements allude to a single conflict is unclear, and a case can be made for two phases of hostilities, in c. 117 and c. 123 (Breeze Reference Breeze2003; Hodgson Reference Hodgson and Hodgson2009a, 16–17). A gravestone from Vindolanda records that a centurion of the Cohors I Tungrorum died ‘in the war’. Although the periods when this unit were in residence cover a wide span, the centurion may well be a casualty of early second-century fighting in the north (Birley Reference Birley1998, 302–303). There is also likely to have been Hadrianic or early Antonine fighting at Burnswark Hill, directly north of the Solway (see p. 87; Reid Reference Reid2016, 26). The flashpoint for a conflict is unclear, but the precedent set in southern Scotland would surely have encouraged the belief that the army could be compelled to withdraw further south. If so, one impetus for the monumental character of Hadrian’s Wall may have been to convey a message to locals and soldiers alike that the military was going to stay. Whether or not Hadrian was the first to develop a formal border zone on the Tyne–Solway isthmus does, though, remain a matter of some controversy.
The Stanegate System
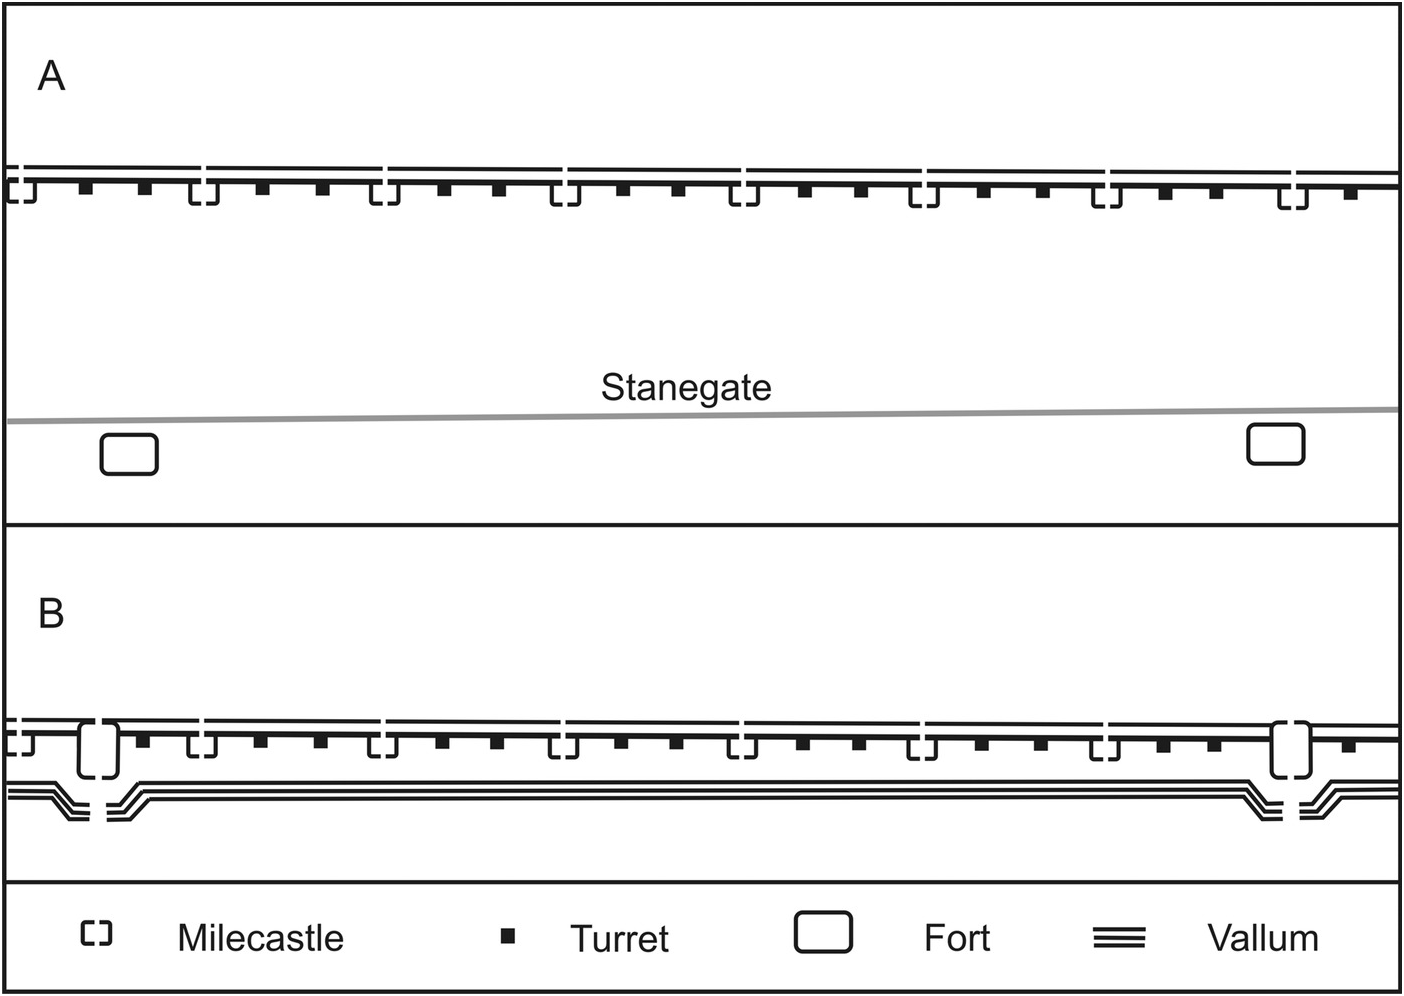
The Stanegate is the modern name for a Roman highway that can be traced in part from Carlisle in the west to just beyond Corbridge in the east. As the road runs a short distance south of the later line of Hadrian’s Wall, the outposts arrayed along the Stanegate in the Trajanic or early Hadrianic period are typically classified as either the components of an early frontier or a highway security system (see Hodgson Reference Hodgson, Symonds and Mason2009d; Fig. 29). The highway itself created a lateral trunk road connecting the two major north–south highways flanking the Pennine ridge. The earliest permanent military posts lay along this line, with the fort at Carlisle seemingly founded in AD 72/73, while that at Red House, near Corbridge, was erected later that decade, with Corbridge superseding it in c. 86. Forts were also arrayed along the course of the Stanegate at around this time. This general pattern, with installations constructed on the north–south highways, followed by garrisons along arterial east–west routes, is not materially different from that along the trans-Pennine highways. The point of departure is often believed to be when outposts were constructed along the Stanegate in the early second century, although as we have seen these also occur at some Pennine passes. As the Stanegate outposts were probably roughly contemporary with the c. 105 withdrawal from Scotland, these two developments have been linked. Although it would certainly be prudent for this redeployment to occasion a re-evaluation of the configuration of military assets along the Stanegate, the question of whether this highway was transformed into a formal border system ultimately hinges on whether the new outposts were primarily designed to safeguard traffic or control north–south movement.

29 The installations arranged along the Stanegate road in the years leading up to the emergence of a mural frontier (above) and Hadrian’s Wall as completed following the fort decision (below).
Various assessments of the potential distribution of sites along a hypothetical Stanegate frontier have been made, but the most influential predicted a semi-regular cordon of forts alternating with fortlets, interspersed with a tower screen (Birley Reference Birley1961, 134). This model was proposed on the strength of two certain fortlets at Haltwhistle Burn and Throp, a probable third at Castle Hill, Boothby, and a miscellany of towers erected either adjacent to the road or on high ground to the north and south. The enduring failure to locate the missing fortlets that this model demanded eventually led to scepticism about the entire frontier concept. A critical re-evaluation of the evidence highlighted that the towers and fortlets may not be contemporary foundations, that the orientation of the fortlet gates implies the road was their focus, and that it was premature to brand the extant sequence a system, let alone a frontier (Dobson Reference Dobson1986, 3–5). It was also observed that the terrain may have influenced deployment, as the known outposts are focused along the upland stretch of road, with a number overseeing river or stream crossings (Bruce Reference Bruce and Daniels1978, 5). Subsequent study introduced a fresh complication with the suggestion that the course of the Stanegate road was guided by the position of the fortlets, implying that they predated construction of the metalled highway (Poulter Reference Poulter1998, 52–53). More recently the wheel has turned full circle and the existence of a Stanegate frontier has been reasserted, on the strength that a contemporary and comparable cordon of sites in Germany existed independently of any road, making border control the only feasible explanation for their presence (Hodgson Reference Hodgson2000).
The question of whether a road even existed when the fortlets were founded is by default an existential one for the notion that they provided highway protection. But even if the metalled road does post-date the fortlets, a reasonably robust thoroughfare of some form must have existed from at least the mid AD 80s to service Vindolanda. The question, then, is not whether there was a road, but whether it was metalled when the fortlets were founded. As we have seen, there seem to be numerous examples of road fortlets associated with unmetalled roads in Scotland. On the Stanegate, Castle Hill, Throp, and Haltwhistle Burn all occupy locations appropriate to road fortlets: Castle Hill lies on the western approach to what is essentially an upland pass, and also overlooks the point where the natural corridor carved out by the Burtholme Beck opens onto the Irthing valley. Throp commands the intersection between the road and the Irthing valley, while Haltwhistle Burn controls the crossing of a steep defile, which leads south to the populous Tyne valley (Fig. 30). The Stanegate fortlets also adhere to the ‘interval’ fortlet model by subdividing the distance between forts, while the towers would be well suited to serve as satellites and observe otherwise obscured terrain (Fig. 29). The only substantive difference between the Stanegate fortlets and standard road fortlet practice is their proximity to forts. Haltwhistle Burn, for instance, lay 5.6km from the neighbouring forts. This is roughly half the distance typically encountered in Wales and the Pennines, but comparable to that on the Gask Ridge. This could relate to a desire for greater control over north–south movement, but may also reflect the demands of the terrain or greater security concerns along this stretch of highway.
30 The location of the Stanegate fortlets at Throp and Haltwhistle Burn. Throp (A) occupies a commanding position over the point where the Irthing exits a narrow gorge and enters the Tipalt–Irthing gap (B). Haltwhistle Burn fortlet lies on a low plateau adjacent to where the Stanegate road crosses the sharp defile carved out by the watercourse (C). This natural corridor leads south to the Tyne valley (D).
Both Haltwhistle Burn and Throp display a distinctive and seemingly unique design quirk (Fig. 31). Instead of the usual arrangement in fortlets containing two gates, where they occupy opposite ends of the installation, the entrances were inserted along adjacent stretches of rampart. At Haltwhistle Burn, both roads leading into the fortlet ran alongside buildings before meeting opposite a small, central room aligned on the east entrance. The excavators suggested that this central structure was inhabited by the commander, which coincides with a belief that buildings occupying similar locations in some Egyptian fortlets served as a day room for the curator (Gibson and Simpson Reference Gibson and Simpson1909, 255; Reddé Reference Reddé and Cuvigny2006, 250). Although parallels between one of the roadside buildings within Haltwhistle Burn and a granary were noted, the excavators rejected this possibility (Gibson and Simpson Reference Gibson and Simpson1909, 252; cf. Breeze and Dobson Reference Breeze and Dobson2000, 18). Nevertheless, it seems convincing and matches the presence of storage facilities in some larger road fortlets elsewhere, such as Castleshaw (Bidwell and Hodgson Reference Bidwell and Hodgson2009, 73). The articulation of the Stanegate fortlet gates makes sense as a way to allow traffic loading, or offloading, goods to circulate easily through the installation. Building a measure to aid traffic flow into the design implies that this was a fundamental concern, suggesting a logistical role for the fortlets, rather than frontier control.
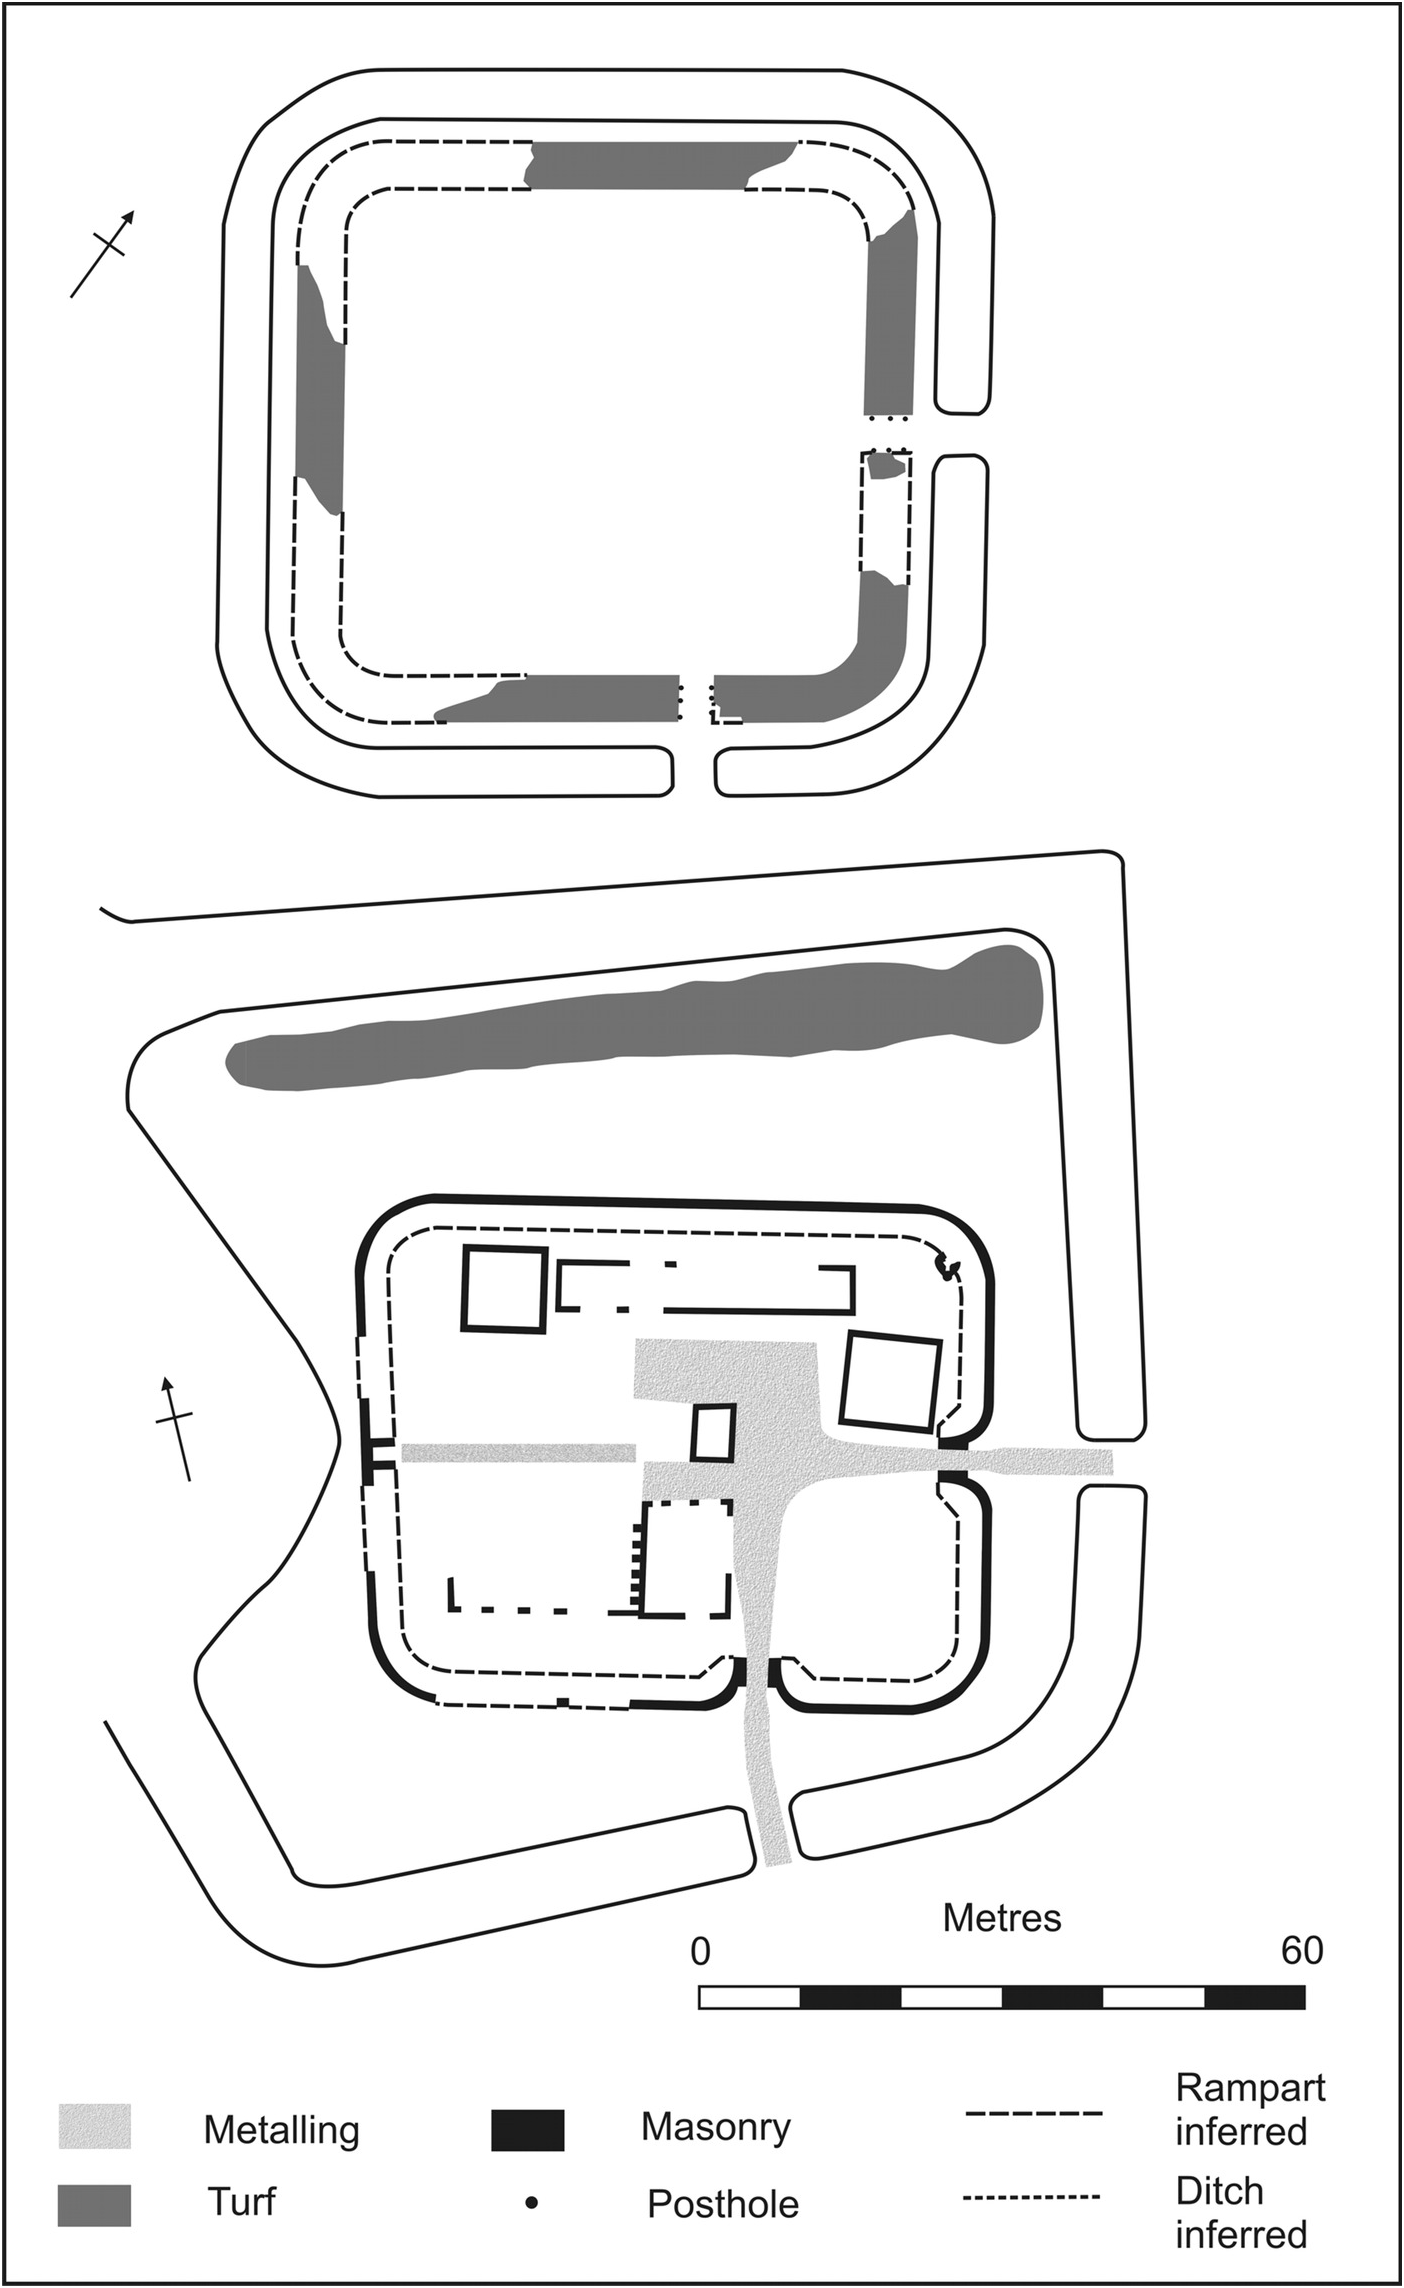
31 The Stanegate fortlets at Throp (top) and Haltwhistle Burn (bottom).
Despite the suitability of the Stanegate fortlets to act as local depots, the idea that the Stanegate was reconfigured into a formal frontier cannot be rejected out of hand. One peculiarity of both Haltwhistle Burn and most of the Stanegate towers is that they were constructed of stone, or in the case of the former, with a masonry rampart revetment, from the beginning. This suggests an expectation of permanence unusual for the period (Dobson Reference Dobson1986, 4–5). Nevertheless, the absence of convincing outposts along the eastern and western stretches of the Stanegate, as well as to the east of Corbridge and west of Carlisle, remains a serious obstacle to the notion that a formal attempt was made to establish a Trajanic frontier across the breadth of the Tyne–Solway isthmus. One explanation for this apparent omission in the east is that the course of the frontier beyond Corbridge swung sharply north-east towards Berwick upon Tweed, following the line of the road now known as the Devil’s Causeway (Collingwood and Myres Reference Collingwood and Myers1936, 127; Hodgson Reference Hodgson, Hodgson, McKelvey and Muncaster2012, 212–213). There is, though, currently no sign of installations occurring along the Devil’s Causeway in anything like sufficient numbers to balance those on the Stanegate.
The Stanegate outposts seem best suited to protecting and supporting east–west traffic along part of what was now the northernmost lateral road under direct Roman control. Even so, occupying or observing natural approaches to the Stanegate from the north and south would be an inevitable by-product. On this basis, it would not be surprising if a further fortlet supervised the course of the Stanegate at the intersection with the North Tyne valley. Perhaps the most pertinent question raised by the suitability of the fortlets to provide local logistical depots is ‘who were they serving?’ Neither the fortlet nor tower garrisons should require such a hub, while resupply centres every c. 6km for official convoys would only seem necessary if traffic was sufficiently heavy to occasion serious concerns about the availability of fodder. There are, though, major advantages to being able to resupply a column on the march at its destination, rather than from its point of departure (Luttwak Reference Luttwak2016, 153). Using the Stanegate fortlets in this way would have alleviated provisioning the considerable influx of soldiers mobilised to construct Hadrian’s Wall, and, most likely, fight the preceding war.
Constructing Hadrian’s Wall
The vision of Hadrian’s Wall that has become ingrained in popular culture is a picture-postcard style panorama of a stone curtain majestically cresting rocky crags. The drama of this setting has been awing visitors for centuries, and the antiquary William Camden’s boast that ‘verily I have seene the tract of it over the high pitches and steep descents of hills, wonderfully rising and falling’ still resonates some four centuries later (Camden Reference Camden1610, 793). Despite the appeal of this evocation of the Wall traversing a desolate wilderness, it is misleading for two reasons. The first is that the precipitous crags convey a sense of the Roman frontier simply reinforcing a natural boundary. Although geologically speaking this may be true, indigenous-style farming settlements that were probably occupied at around the time of the Roman conquest do not discriminate between land to the north and south of the crags. Then as now, the northern crest of the Whin Sill forming the outcrops did not cleave a corresponding fissure through the human geography. The second reason why this image of Hadrian’s Wall is misleading is that although stretches of Wall curtain do indeed cling to crags, this only amounts to c. 12 Roman miles in the middle of the frontier’s 80-mile span. It falls within a length of frontier known by specialists as the ‘central sector’. Although this area is an anomaly in terms of the marginality of the terrain and the severity of the topography, it is also the best understood part of Hadrian’s Wall.
There are various reasons why the stretches of frontier bisecting the gentler terrain to the east and west of the central sector have been less intensively explored, but perhaps the most important concern access and preservation. Furthest to the east, a substantial swathe of the frontier is buried beneath modern Tyneside and Newcastle. Beyond that, long stretches of the curtain scything through rolling arable farmland between Newcastle and the central sector are sealed beneath the modern B6318 road. West of the Irthing valley lies the Red Rock Fault, so called because the durable limestone and dolerite bedrock to the east gives way to a friable red sandstone. This stone has deteriorated over the passing centuries, severely degrading buried masonry. Despite the challenges impeding study of the east and west sectors, important details were gleaned both during pioneering investigations in the first half of the twentieth century, and more recently through rescue and developer-funded excavations. A key early discovery was that in general terms the frontier adopted a standardised template governing the distribution of installations along it (Fig. 32). The only notable possible exception to this broad uniformity is a sequence of obstacles on the berm between the Wall curtain and ditch. Emplacements are believed to have held timbers with sharpened branches, creating the Roman equivalent of a barbed-wire entanglement, but to-date they have only been detected at sites in the vicinity of Newcastle (Bidwell Reference Bidwell2005).
32 The initial concept for Hadrian’s Wall was a cordon of fortlets and towers, with the forts lying to the south. By the time the frontier was complete, a series of forts had been added, while an enigmatic earthwork known as the Vallum ran to the south of the border works.
Despite this standardised blueprint, the works were not executed in identical fabric. East of the River Irthing, in the central and eastern sectors, masonry was employed for the Wall curtain and its installations. West of the Irthing, only the Wall turrets were originally built of stone, with the remainder constructed of turf and timber. Numerous explanations for this have been advanced over the years. One popular premise is that a parlous military situation in the west made rapid construction in turf and timber particularly appealing (Graafstal Reference Graafstal2012, 136–138). Two alternatives hinge on the varying availability of raw materials, including the difficulty of securing sufficient limestone to create lime mortar west of the Red Rock Fault. A growing appreciation that mortar was only used sparingly in the original Hadrianic curtain, coupled with the later rebuilding of the Turf Wall in stone casts doubt on this explanation. The core concept, though, has been neatly inverted by the observation that turf and timber rather than stone was the Roman army’s building medium of choice in Britain at this time, and that the real problem could be a lack of suitable turf in the rocky central sector and intensively farmed east (Breeze Reference Breeze2006, 59). Whether such superstructure would have been equal to the inclines scaled by the Stone Wall in the central sector is questionable, but the split between turf and stone seemingly represents an early incidence of local factors forcing variation on a frontier concept that prized uniformity.
The basic format of Hadrian’s Wall remained the same regardless of whether it was raised in turf or stone. Indeed, the regimented frontier blueprint could be construed as a calculated attempt to eliminate opportunities for local refinement, a scenario that has been memorably likened to the old military adage ‘you are not paid to think’ (Woolliscroft Reference Woolliscroft1989, 7). Disentangling the order in which the constituent parts of Hadrian’s Wall were installed was a major research objective in the late-nineteeth and twentieth centuries, when excavations revealed that there were really two Hadrianic concepts for Hadrian’s Wall (Birley Reference Birley1961, 269–270; Breeze Reference Breeze2014a). The change in plan occurred before construction of the original version was complete, and is referred to as the ‘fort decision’ (Fig. 32). As the term indicates, the most striking feature of this fundamental reimagining of the frontier was the addition of a series of forts. Although only the post-fort-decision version of Hadrian’s Wall entered full service, in order to appreciate the shifting goalposts of Roman frontier policy it is essential to assess both the capabilities of the original concept and how this informed the way the army sought to bring it into operation. Reconstructing the construction schedule is facilitated by a reduction in the width of the Stone Wall from a Broad gauge of c. 2.9m, to a Narrow one of c. 2.3m, which was approximately contemporary with the fort decision. This difference in width allows us to isolate the elements that were erected first, which indicates that the construction programme was guided by a coherent set of priorities (Symonds Reference Symonds2005; Graafstal Reference Graafstal2012).
The Original Concept
The original frontier concept seems to be predicated on two core tenets: that the manned installations along the Wall curtain would only comprise a regular cordon of milecastles and turrets, and that the principal military might would be stationed in the forts that already existed along the Stanegate road and the main north-south highways (Birley Reference Birley1961, 270). An initial belief that the line of control did not need to coincide directly with the forts holding the bulk of the manpower follows the general principle adhered to by the Gask, Exmoor, and Danube cordons. Ultimately both these principles were overturned by the fort decision, but they had already shaped the overall frontier design to such a degree that their influence resonated throughout the operational lifespan of Hadrian’s Wall. The desire to draw on the existing pool of manpower along the Stanegate road emphasises that despite the effort expended on constructing Hadrian’s Wall, it was not perceived as an opportunity to draw a line in the sand and commission a frontier de novo. Instead, it was simply grafted onto a pre-existing system (Breeze and Dobson Reference Breeze and Dobson2000, 26–28). The practical implications of this arrangement were far-reaching. Its most pervasive legacy concerned the course of the Wall curtain, which seemingly prioritised a visual link to the south – towards the Stanegate – at the expense of capitalising on the strongest view north (Poulter Reference Poulter2009, 79–81). It has been pointed out, though, that this difference was not as marked from turret height (Foglia Reference Foglia2014, 41). Even so, the implication that the small garrisons dispersed along the Wall curtain were intended to signal to the forts to the south is reinforced by subtle variations in spacing between milecastles and turrets in the central sector, which aided establishing visual links with the Stanegate installations (Woolliscroft Reference Woolliscroft1989, 9). Although adding forts to the Wall curtain obviated the need for any southerly signalling network, there are few examples of the course of the Wall or the siting of installations along it being adjusted to reflect these changed circumstances.
How the milecastle and turret garrisons were supported to the east and west of the Stanegate’s known course remains unclear. Some military infrastructure existed in these areas, although many of the details of a postulated ‘western Stanegate’ beyond Carlisle remain deeply problematic (see Jones Reference Jones1976), and few of its proposed installations truly resemble military sites. Nevertheless, a pre-Hadrianic fort did lie to the rear of the Wall at Kirkbride. On the other side of the country, east of Corbridge, an undated fort is known south of the Tyne at Washingwells (McCord and Jobey Reference McCord and Jobey1971, 120). The stark contrast between these isolated forts and the Stanegate sites has led to a conviction that a greater concentration of manpower must have been planned in these areas, possibly even on the line of the Wall (See Crow Reference Crow and Todd2004, 126–129). Yet the strength of the Stanegate line is potentially misleading. Fewer military units were stationed in the wider hinterland to the south of the central sector, as the Pennine hills compressed the forts into a narrow corridor. To the east and west, however, forts were stacked like rungs on a ladder up the main north–south highways. This created a much larger potential reservoir of soldiers, but at a greater distance. An additional objection is that the forts at Kirkbride and Washingwells could not have provided enough soldiers to garrison sufficient milecastles and turrets. Elsewhere, though, fortlets could be manned by soldiers drawn from units based tens or even hundreds of kilometres distant. There is no reason why this approach could not have been replicated along Hadrian’s Wall.
As observed in Chapter 1, the regular sequence of milecastles and turrets forming the backbone of Hadrian’s Wall constitutes by far the most famous incidence of outpost use by the Roman army. Our familiarity with the conceit of positioning installations according to a preconceived spacing system can blind us to the radical innovation this represented. If one word was needed to sum up the various Roman provincial armies’ approach to establishing outposts prior to the planning of Hadrian’s Wall, then ‘flexibility’ would be an apt choice. This was manifest in the freedom both to tailor the basic outpost design to local context, and to position it in the most advantageous setting relative to the physical and – presumably – human geography. Admittedly there was a certain predictability to fortlets being founded at approximate midpoints between forts, but even along nondescript stretches of road attempts to exploit the optimal setting are evident. Hadrian’s Wall took the opposite approach. There, the outposts were ordered according to a spacing system that positioned milecastles at intervals of one Roman mile, with two turrets subdividing the intervening distance. The result was a manned installation approximately every 495m. This is a little over half the shortest distance between outposts known on the Gask Ridge, meaning that Hadrian’s Wall created a more close-set outpost cordon than had previously been seen in Britain. In 1930, the milecastles were numbered from east to west, while the pair of turrets to the west of each milecastle were designated with the same number and distinguished by an ‘a’ or ‘b’ (Collingwood Reference Collingwood1930). The ensuing group of a milecastle and the two turrets to its west is termed a ‘Wall mile’, resulting in the regular outpost cordon bequeathing the modern conceptual blocks by which the frontier is studied.
Inevitably, imposing a regular sequence on irregular ground threw up anomalies. The most severe of these – such as when a measured position lay in a watercourse or on a split-level – were sidestepped by subtly adjusting the distance between neighbouring outposts and therefore the overall length of Wall miles. As has been noted, in the central sector signalling concerns also seem to have dislocated installations from their measured position (Woolliscroft Reference Woolliscroft1989, 9). One side effect of this nuancing of the spacing formula is that the Wall ‘miles’ do not have an identical length and so are categorised as either ‘long’ or ‘short’ depending on whether they are greater or lesser than the target distance of 1479m, or 1 Roman mile. It is worth noting that these measurements are based on those given by Collingwood in 1930, which appear to be distances as seen on a map. Despite this demonstration that the regular sequence was not regurgitated blindly, the degree of flexibility permissible remained strictly limited, and the greatest certain difference between a measured and an actual position is 210m. As a result, the concept is most appropriate to the long, straight alignments and comparatively gentle terrain encountered in the east and west sectors. The collision between the regular spacing system and the irregular central sector crags is characterised by a failure to capitalise on the strongest terrain. Even though the milecastles lie on average 64m from their measured positions, multiple outposts still occupy obviously inferior positions (Woolliscroft Reference Woolliscroft1989, 7). This stubborn determination to work against the tenor of the landscape runs completely counter to the first-century policy of siting outposts in order to maximise the impact and utility of small garrisons.
The other weapon in the army’s arsenal when it came to ensuring that outposts were as efficient as possible – namely bespoke installation designs – was spiked by the imposition of generic milecastle and turret templates (Fig. 33). Although the legions constructing the Wall adopted subtly different blueprints, and no two outposts are identical, the level of standardisation displayed by the milecastles was unprecedented. In plan these consisted of small, rectangular enclosures that were attached to the running barrier and have an average internal area of 292m² on the Stone Wall. These dimensions fall towards the lower end of the range exhibited by fortlets, and the milecastles’ stunted size may well be a concession to their enforced proximity. The Stone Wall turrets were recessed into the border curtain, while the most obvious variation in their plan is whether the entrance lay at the south-east or south-west corner. Nothing is known about turret height and little regarding whether the upper floor was open or roofed. A group of souvenir skillets from Hadrian’s Wall depict what appear to be stylised open-topped and crenellated turrets, but roofing materials have been discovered at a handful of sites (Cowen and Richmond Reference Cowen and Richmond1935, 328; Breeze Reference Breeze2006, 71). It is worth noting that the only reason to assume that the turrets had identical heights and upper furniture is the general uniformity that the broader frontier design revels in.

33 The fortlets built along Hadrian’s Wall were unusually standardised in plan. This shows what the excavators considered to be the first phase of occupation: (A) milecastle 9, (B) milecastle 35, (C) milecastle 37, (D) milecastle 47, (E) milecastle 48, (F) milecastle 50 on the Turf Wall.
One conspicuous element of milecastle design has come to monopolise discussion of the purpose of both these fortlets and Hadrian’s Wall. Ever since the first example was unearthed at milecastle 42 in 1848 (Clayton Reference Clayton1855, 59) – even though an example had previously been observed at milecastle 29 (Horsley Reference Horsley1732, 121) – the presence of paired north and south gateways has eclipsed every other aspect of these fortlets. The reason for this is that these portals provided passage through Hadrian’s Wall, elevating the milecastle garrisons to the status of the gatekeepers of Roman Britain (Symonds Reference Symonds, Collins and Symonds2013, 66). The only other places where transit is known to have been possible under the original scheme is where the main highways north crossed the curtain at the Portgate in the east, and north of Carlisle in the west. If Hadrian’s Wall regulated the peaceful movement of people, then although travellers had to negotiate a wider frontier zone to the north and south, the milecastles served as the nodes where customs duties were levied, searches conducted, and paperwork filled out. Alternatively, if the frontier served as a closed military barrier, then the gates would have been barred to all but official traffic. In essence, then, understanding the role of Hadrian’s Wall comes down to establishing who could pass though the milecastle gates.
Despite the awkward relationship with the terrain that some milecastles and turrets display (Fig. 34), they were carefully integrated with the wider frontier infrastructure. Both installation types were anchored into the Wall curtain, creating a comparatively narrow line of control. Although the presence of frontier gateways within the milecastles required them to be in physical contact with the curtain, this did not apply to the turrets. The most obvious reason to attach them to the curtain would be the existence of a wall-walk. Numerous strands of circumstantial evidence point to the existence of such a feature, and the only real reason to doubt its presence on Hadrian’s Wall is the demonstrable absence of a wall-walk on the German frontiers (Bidwell Reference Bidwell and Bidwell2008; Symonds Reference Symonds, Morillo, Hanel and Martín2009a). Given that the Tyne–Solway isthmus was more densely settled by indigenous groups than almost all of the hinterland of the German limites, the additional level of control offered by an elevated sentry walk may have been considered appropriate (Symonds Reference Symonds2015c, 305). If so, it was probably initially planned to stand c. 4.3m above ground level, as elements of milecastles 37 and 48 point to this being the original height of the Wall curtain (Gibson and Simpson Reference Gibson and Simpson1911, 419–420). The running barrier, milecastles, and turrets, were augmented by a ditch to the north, except where the crags rendered it redundant. Careful survey of this ditch suggests that earth causeways were initially retained opposite the milecastle gates, permitting access north (Welfare Reference Welfare2000).

34 Milecastle locations: (A) milecastle 37 opened onto a steep drop, (B) milecastle 39 was shifted from its measured location to more suitable ground, (C) milecastle 42 was positioned on a steep slope, facing an even steeper slope, despite lying adjacent to a pass on level ground, (D) milecastle 48 lies on a one-in-five slope.
Conquering a Landscape
It is possible to reconstruct the building schedule of the Stone Wall in some detail, and this suggests that the shortcomings of the spacing system were understood by the army and that the construction programme was manipulated in order to mitigate them. As the milecastle ramparts were seemingly built to the same width as the curtain, and as both milecastles and turrets were constructed with stubby wing walls to bond them into the running barrier, it is possible to determine whether they were built during the lifespan of the Broad or Narrow Wall. As the latter was introduced after the fort decision, this allows us to see whether the Wall structures pre- or post-date it. In most cases, modular construction was preferred for the milecastles and there are numerous instances of elements such as the north rampart and gateway being constructed to the Broad specifications, with the remainder of the installation being subsequently completed to a narrower width (Symonds Reference Symonds2005, 77–78). Although the majority of the turrets were begun to the Broad Wall standard, whether they were erected to their full height or simply raised a couple of metres to mark their position remains disputed (see Hill and Dobson Reference Hill and Dobson1992, 40; Graafstal Reference Graafstal2012, 130–131). It has been plausibly suggested, though, that selected turrets and north milecastle gate towers were prioritised for construction in order to establish a surveillance screen along the projected course of Hadrian’s Wall (Graafstal Reference Graafstal2012, 131).
A number of milecastle ramparts do appear to have been completed to the Broad specifications: milecastles 47 and 48 (see Box 5; Fig. 33) bar the topographical bottleneck between the Irthing and Tipalt valleys; milecastle 27 controls the major natural communications artery created by the North Tyne valley; milecastle 23 overlooks the course of Dere Street; milecastle 14 secures the March Burn; milecastle 10 lies adjacent to the sharp defile of Wallbottle Dene. It is striking that these settings comprise a combination of concealed crossing points and natural and artificial corridors bisecting the frontier zone. They are precisely the locations where standard, freestanding fortlets might be expected if the army was seeking to tighten control over north–south passage across the projected Wall line (Symonds Reference Symonds2005; Wilmott Reference Wilmott and Wilmott2009, 198).
Box 5: Milecastle 48
The most influential campaign of excavations at milecastle 48 came about by chance in 1909, when the original objective sought by J.P. Gibson and F.G. Simpson proved elusive. In order to keep their workmen occupied, Gibson and Simpson set them to work on the nearby milecastle, which had been investigated in 1886 with indifferent results. Fresh digging revealed ramparts still standing up to 2.7m high, and traces of a secondary narrowing of the gateway. This piqued the interest of Gibson and Simpson, who refocused their efforts on the milecastle and revealed a remarkable internal layout. For the first time on Hadrian’s Wall, the different phases of activity preserved within the milecastle were dated using the associated small finds, a breakthrough that revolutionised frontier studies (see Gibson and Simpson Reference Gibson and Simpson1911).
Known as the Poltross Burn milecastle, until the frontier outposts were numbered in 1930, the installation controls a key location within the Irthing Gap. Immediately east of the milecastle the ground falls sharply into the Poltross Burn Channel, while the opening where the River Irthing enters the Gap lies almost directly north. Despite these advantages, the plot occupied by the milecastle is an awkward one, with the ground rising by one in five from north to south within its ramparts (Fig. 34). Even so, milecastle 48 was selected as one of a handful of ‘priority’ milecastles that were fast-tracked for completion early in the frontier construction schedule (Symonds Reference Symonds2005).
The buildings within both milecastle 48 and 47 may well have been erected prior to the fort decision. At milecastle 48, the 395m² interior contained two large barrack blocks set either side of the central road, while an oven lay in the north-west angle and a flight of stairs in the north-east corner. Extrapolating from the surviving steps gives an external height of 4.3m for the Wall curtain, while the barrack blocks are judged appropriate for a garrison thirty-two strong (Gibson and Simpson Reference Gibson and Simpson1911, 420; Breeze and Dobson Reference Breeze and Dobson1972, 188–189). It is possible that the soldiers did not have this space to themselves, though, as the site has yielded three harness fittings (Jilek and Breeze Reference Jilek, Breeze, Hingley and Willis2007, 208). This is an exceptional number for a milecastle and hints at the presence of a mounted element.
At the other end of the scale is milecastle 35, which lay directly south of a 30m vertical drop, making it one of the least-promising locations for infiltration along the Wall. This installation comprises a hotchpotch of walls completed to different widths and standards, suggesting disjointed construction. Even here there may be method to this seeming incoherence, as milecastle 35 reverses the usual pattern by having a Broad south and Narrow north rampart. This would be explicable if the absence of a north gate at this milecastle meant that there was also no north gate tower, resulting in the south gate being prioritised to establish a surveillance capability (Symonds and Breeze Reference Symonds and Breeze2016, 3). The indications that construction at the site was repeatedly interrupted would fit with construction teams being reassigned to more pressing jobs. Designating milecastles high or low priority suggests that the army appreciated that some installations were more useful than others, and brought them into operation accordingly. Graafstal (Reference Graafstal2012) has proposed a priority programme for the Wall more generally, and there are repeated indications that the army took practical measures to tighten control of the frontier line as construction proceeded.
If the army was aware of the weaknesses, or perhaps more accurately inefficiencies, of the core frontier format, it raises the question of why they did not simply revise the scheme wholesale. One possibility is that the design was the brainchild of Emperor Hadrian himself. Hadrian’s architectural pretentions are the subject of an anecdote related by Cassius Dio, and the emperor may have developed his own solution to Rome’s border problem (History of Rome 69, 4; Breeze Reference Breeze2009b). If Hadrian devised a concept that was intellectually satisfying on paper but flawed in practice, it would explain why the army felt compelled to implement a design that it was not wholly comfortable with, employing only subtle variations to soften its excesses. There would be no reason to extrapolate from this that the outcome is essentially a grandiose vanity project that tells us nothing about the needs of border security in Britain, though. On the contrary, it is appropriate to seek a rational, functional explanation for the milecastle and turret cordon rather than regard it as hollow imperial rhetoric.
A modern focus on the importance of the passageways has seen the milecastles branded ‘fortified gateways’ (Breeze and Dobson Reference Breeze and Dobson2000, 33–40), even though the tyranny of the spacing strictures repeatedly situated them in unsuitable locations. In the central sector, numerous milecastle gates open onto precipitous drops or bogs impassable to wheeled vehicles, demonstrating that creating convenient transit points was not the guiding concern. This is not to say that providing north–south access was in itself unimportant. Some milecastle gateway types stood taller than the entrances to nearby forts (Bidwell Reference Bidwell, Flügel and Obmann2013, 84), and the provision of regular crossing points could easily be an attempt to minimise the obstacle that the Wall presented to Roman military manoeuvring. Nevertheless, the distribution of milecastles in the central sector emphasises that a broadly regular cordon was prioritised above having gates in the most suitable locations (Fig. 34). The premium afforded to maintaining garrisons at fixed distances is neatly illustrated by milecastles 35 and 37. Milecastle 35 was probably never equipped with a north gateway, presumably because it was positioned on the lip of a 30m drop (Woolliscroft Reference Woolliscroft1989, 7; Symonds Reference Symonds, Collins and Symonds2013, 55–56; Fig. 33). The possible collapse and certain blocking of the north portal at milecastle 37 before construction of the internal roadway was complete suggests that it also emerged from the construction process unable to permit north–south passage through the curtain (see Crow Reference Crow and Bidwell1999, 127; Hill Reference Hill, Collins and Symonds2013, 69; Fig. 33). Nevertheless, both milecastles were manned in the usual fashion, emphasising that facilitating cross-border transit was not their sole role.
A compelling reason for prioritising the spacing system would be if manned installations approximately every 495m were believed to present the best means of minimising undetected incursions across the curtain Wall, regardless of local context (Symonds Reference Symonds, Morillo, Hanel and Martín2009a; Symonds Reference Symonds, Collins and Symonds2013, 67). Indeed, the spacing interval may have been determined by the acuity of human eyesight, inspiring an analogy between turrets and surveillance cameras (Foglia Reference Foglia2014, 38), albeit ones with an intercept capability. How many soldiers were needed to operate this system, and what they were watching for, are important questions. Although the size of the milecastle garrisons as originally intended is unknown, the large double barrack blocks discovered within the Broad Wall milecastles 47 and 48 probably precede the fort decision and so offer a guide (Symonds Reference Symonds2005, 73–76; see Box 5; Fig. 33). It has been estimated that these could hold thirty-two soldiers (Breeze and Dobson Reference Breeze and Dobson1972, 188–189), which is probably the upper limit of potential garrison size. Multiplying this by the eighty-one milecastles,Footnote 1 and assuming that the turret garrisons were rotated from them, delivers a speculative maximum commitment of 2,592 soldiers to man the abortive pre-fort-decision border cordon. If a third of these personnel were on duty at any given time, this would leave approximately eleven soldiers guarding each Wall mile. Although hypothetical, such a number would suggest that the biggest challenges the garrisons were expected to face were low-intensity threats. Numerous authorities have observed that the milecastle and turret cordon would provide an effective anti-raiding shield (e.g. Collingwood Reference Collingwood1929, 143; Collins Reference Collins2012, 73; Graafstal Reference Graafstal2012, 161), and this is probably an accurate assessment of the upper level of belligerence their garrisons were expected to handle.
An article that posed the question ‘Who ran Hadrian’s Wall?’ concluded the answer was probably ‘nobody’, or at least no one person (Edwards Reference Edwards2009, 223). This must be considered questionable, though, as issuing different milecastle garrisons with different standing orders concerning who could pass through the frontier, and under what circumstances, would undermine the effectiveness of the entire system. It seems probable, though entirely hypothetical, that an equivalent to the Prefect of the Desert, who oversaw and coordinated the frontier zone in Egypt’s Eastern Desert (Cuvigny Reference Cuvigny and Cuvigny2006b, 295), existed on Britain’s northern frontier.Footnote 2 Whether the individual milecastle garrisons would have discharged their duties in an identical fashion is a different question. The Egyptian ostraca reveal that the praesidia garrisons had a fondness for financial schemes of dubious legality and an apparent readiness to resort to bribery. Passes to use the desert routes were usually issued by centurions (Cuvigny Reference Cuvigny and Cuvigny2012c, 117–118) rather than the lower ranking praesidia curatores, quite possibly to restrict opportunities for graft. Detailing centurions to all eighty-one milecastles seems impractical, and in all probability their commanders were drawn from the lower ranks, as in Egypt. As the ultimate arbiters of who could pass through the Wall curtain, these commanders were in a potentially lucrative position. It is interesting to ponder just how big a sum would induce the milecastle garrisons to turn a blind eye to unsanctioned access by civilians or even Roman soldiers (Woolliscroft Reference Woolliscroft1999; Symonds Reference Symonds, Collins and Symonds2013). Before those manning the milecastles had any opportunity to explore these possibilities, though, the post-fort-decision version of Hadrian’s Wall eliminated this element of their autonomy.
The Fort Decision
On the eve of the cessation of work prior to the fort decision, Hadrian’s Wall was very much a work in progress. To the east, stretches of Broad Wall probably stood to their full height, while some milecastles supervising natural passages or roads crossing the border may have been complete. In the central sector, milecastles 47 and 48 were probably manned (see Box 5), while good progress may well have been made on the Turf Wall. In the central and eastern sectors, work had commenced on the majority of the turrets, and some were sufficiently complete to contain a hearth or scatter of pot sherds. Numerous milecastles, though, were represented by little more than their north rampart and, perhaps, gate tower (Graafstal Reference Graafstal2012, 131). Foundations for the curtain had yet to be laid along some westerly crags in the central sector, and work had not started on a handful of milecastles and turrets. In places, the construction hiatus appears to have been sufficient for a depth of sediment to build up over unfinished infrastructure and it has been estimated that in some cases several years elapsed (Crow Reference Crow1991, 55; Reference Crow and Bidwell1999, 38; Graafstal Reference Graafstal2012, 138). Whether this neglect can be assigned to a single incident is unclear, though, as evidence for another pause has been gleaned from the masonry and stratigraphy within some of the new Wall forts (Wilmott Reference Wilmott1997, 100; Hill Reference Hill2006, 140–144).
The fort decision is traditionally linked to a need to ease military deployment north of the curtain. Graafstal has demonstrated that work on Hadrian’s Wall could have commenced in anticipation of the emperor’s visit to Britain in AD 122. He proposes that Hadrian was responsible for ordering forts added to the frontier line when he inspected the progress of building operations (Graafstal Reference Graafstal2012, 128). Hodgson, meanwhile, has noted that the possibility of a link between a notional second Hadrianic war during the early 120s and the fort decision has not been thoroughly explored (Hodgson Reference Hodgson and Hodgson2009a, 16). This possibility merits serious consideration. The observation that ‘the very act of building the Wall may have exacerbated feelings among communities on both sides’ is ripe with understatement (Graafstal Reference Graafstal2012, 161). Traces of agricultural activity have been found buried beneath Roman military works in numerous locations, and it is clear that the eastern stretch of frontier crossed a landscape that was home to a populous agricultural community (Symonds Reference Symonds, Symonds and Mason2009b, 9; Hodgson Reference Hodgson, Hodgson, McKelvey and Muncaster2012, 209–210). If relations were already strained in the aftermath of a first Hadrianic war, unilaterally dividing a settled farming landscape can only have stoked resentment. An equally compelling reason for believing that the fort decision could have been forged in a cataclysm is the extent to which it recast the scope of Hadrian’s Wall.
The practical implications of the fort decision on the ground are well rehearsed. The most eye-catching alteration was the addition of approximately 9,090 soldiers stationed in a series of forts, which were either physically integrated with the running barrier, or positioned directly to its rear (Fig. 29; Breeze and Dobson Reference Breeze and Dobson2000, 54). In some cases the forts were positioned astride the Wall curtain, maximising the number of gates opening to the north (Breeze and Dobson Reference Breeze and Dobson2000, 47). As well as creating a significant increase in workload, building these forts necessitated demolishing existing stretches of curtain, turrets, and milecastles, as well as backfilling the Wall ditch. To the rear of the new forts and Wall curtain, a monumental ditch 6m wide and 3m deep was cut. Flanked by earth mounds, the ensuing obstacle is 36m wide and has been referred to by the misnomer of ‘the Vallum’ ever since it was described as such by the Venerable Bede in the eighth century AD (Breeze Reference Breeze2006, 84). This earthwork is without ready parallel in the Roman world, but it has been convincingly construed as a measure to deny access to groups on horseback (Woolliscroft Reference Woolliscroft1999, 61). As the only causeways across the Vallum lay opposite the forts, it would also provide a check on who the milecastle garrisons were allowing through the Wall curtain (Woolliscroft Reference Woolliscroft1999, 62). The reduction from the Broad to Narrow gauge is best understood as a measure to speed up completion of the construction work (Breeze and Dobson Reference Breeze and Dobson2000, 59). As well as transforming the distribution of force along the curtain, the addition of forts probably had a major impact on plans for the milecastle garrisons.
One of the enduring mysteries of Hadrian’s Wall is why, apart from the double barrack blocks in milecastles 47 and 48, the majority of these installations seemingly contained large areas of unused space during their primary phase (Fig. 33). As we have seen, elsewhere full use was made of the area within fortlets; after all, there was little point enclosing surplus space within defences. Because many of the extant internal milecastle layouts were elucidated during early excavations some caution is necessary, as it is conceivable that these pioneering investigators missed the traces of earlier, timber buildings. Nevertheless, the small stone barrack blocks in milecastles 9, 35, and 37 are sufficiently similar to the one secure example of a Hadrianic internal layout – from milecastle 50 Turf Wall (so named to distinguish it from the stone version of milecastle 50, which lay on a different site) – to make it credible that they accurately reflect the original arrangement. These diminutive buildings are estimated to be appropriate for a garrison of eight (Breeze and Dobson Reference Breeze and Dobson1972, 188–189), a figure so small that it is suggestive of a radical change of plan. If the large double barrack blocks in milecastles 47 and 48 were erected before the fort decision, then it seems probable that the small, single barrack blocks reflect the changed circumstances in its aftermath. Surprisingly, the presence or absence of a frontier gateway seemingly had no impact on garrison size. Even though north–south passage was possible at milecastles 9 and 50 Turf Wall, but not at milecastles 35 and 37, all four fortlets contained barrack blocks of a similar size (Fig. 33). This suggests that whoever passed through these portals required minimal supervision, which must point to them being routinely used for military rather than civilian traffic (Dobson Reference Dobson1986, 12; Hodgson Reference Hodgson and Visy2005b, 186; Symonds Reference Symonds, Collins and Symonds2013, 68; Hanson Reference Hanson, Collins and McIntosh2014, 8–9).
If the projected milecastle detachment size was cut from thirty-two to eight, it would equate to a collapse in total numbers on outpost duty from c. 2,592 to c. 648. The impact of this on the surveillance screen may have been mitigated by the forts usurping part of the milecastles’ intended function. It is likely that the milecastles were originally designed to accommodate a contingent of soldiers that was large enough to be self-sustaining by comprising members that were both on and off duty. The soldiers manning the turrets were probably drawn from these garrisons (Dobson Reference Dobson1986, 12; Hanson Reference Hanson, Collins and McIntosh2014, 8). Following the fort decision this plan might have been revised so that the milecastles and turrets were occupied by rotating details of on-duty soldiers, who returned to their home forts for rest. If so, the provision of shelter for eight in the milecastles, combined with perhaps two soldiers in each turret, would result in approximately twelve out-posted soldiers per Wall mile. Although entirely speculative, this number is intriguingly close to the eleven on-duty soldiers estimated, albeit equally hypothetically, for the pre-fort-decision deployment. Perhaps the assumed curatores would be posted to the milecastles for a longer duration to create an element of continuity. Naturally, if a garrison of eight had to be subdivided into different shifts, it would be tantamount to deployment along the curtain being rebalanced away from dispersed detachments targeting infiltration, and towards concentrated units capable of projecting power outwards. Even if the number of soldiers on outpost duty did remain stable, though, the sudden need for both the Wall forts and the Vallum is redolent of a shift in the prevailing military situation. This would fit with the aftermath of a bout of open warfare, which had its epicentre to the north of the Wall.
Rediscovering Irregularity
Another, subtler shift discernible in the frontier fabric concerns attitudes towards the topography, and the general concept of uniformity (Fig. 35). This is best illustrated by two turrets, numbers 44b and 45b, which were tucked into right-angled corners of the curtain overlooking the flanks of Walltown Crags. Although both turret 45b and its immediate landscape setting were destroyed during nineteenth-century quarrying, 44b reveals the extent to which Narrow Wall turrets could diverge from the Broad Wall model. As well as boasting smaller dimensions than usual, turret 44b lies only 361m from the neighbouring 44a (Collingwood Reference Collingwood1930, 113). This is one of the shortest intervals between installations on the Wall, and it is likely that 44b was offset from its measured location so that it could occupy ‘an extensive outlook’, which ‘completely enfilades and commands the Walltown defile’ (Gibson Reference Gibson1903, 14; Symonds Reference Symonds, Collins and Symonds2013, 58). This degree of flexibility in the face of the landscape is anathematic to the original concept. As most of the turrets elsewhere were already fixed by Broad Wall construction work, there was limited scope for such adjustments elsewhere. There are hints, though, that it did occur.

35 The position of Narrow Wall and later installations: (A) this photograph of Turret 45b, taken in the 1880s before it was destroyed by quarrying, shows it perched on the edge of a crag, (B) turret 44b overlooks a natural passageway and commands a fine view, (C) the Peel Gap tower occupied a natural corridor that previously lay in a blindspot, (D) the Knag Burn gate was knocked through the Narrow Wall to the north-east of Housesteads fort.
A number of former Turf Wall milecastles that were rebuilt in stone to the Narrow specifications display increased flexibility in terms of dimensions and shape (Symonds Reference Symonds, Collins and Symonds2013, 59). This is particularly apparent directly east of the Irthing crossing, where a group of former turf milecastles were rebuilt in stone with internal areas of unusual size. The largest of these is milecastle 52, which has an internal area of 644m² – over twice the Stone Wall average. It is also noticeable that while Broad Wall turrets only rarely coincide with changes in direction of the Wall curtain, all of the known Narrow Wall turrets in the central sector occur at such points (Symonds and Breeze Reference Symonds and Breeze2016). This practical refinement would have improved lines of sight along the Wall curtain. On this basis, it seems that evidence can be found in the Wall fabric for two subtly different approaches to mitigating the effects of the collision between the regular sequence and the terrain. Although both Broad and Narrow Wall structures were shifted from their measured locations, during the first phase the preference seems to have been to prioritise structures that naturally occurred at important points. Following the advent of the Narrow Wall there was an increased willingness to deviate from both the strictures of the spacing system and the generic installation plans to ensure that the milecastles and turrets were tailored to their local context (Symonds Reference Symonds, Collins and Symonds2013, 67; Symonds and Breeze Reference Symonds and Breeze2016, 12).
An example of a natural passage being garrisoned as an afterthought occurs at the western end of the Peel Crags. There, an extra tower was built abutting the Narrow Wall, at a point where it was otherwise possible to approach and cross the Wall curtain unobserved by soldiers manning the adjacent turrets (Crow Reference Crow1991, 53; Symonds Reference Symonds, Collins and Symonds2013, 59; Foglia Reference Foglia2014, 38; Fig. 35). The very need to insert the Peel Gap tower is a fitting indictment of the weaknesses of the spacing system, while its construction reinforces the indications that the frontier template was relaxed towards the end of the building programme to permit more effective use of the terrain. Excavations in Peel Gap recovered two piles of possible slingstones and a ballista bolt from the tower, while an arrowhead was found nearby (Crow Reference Crow1991, 53). Artillery projectiles and possible slingstones are also known from a handful of other turrets and milecastles (Bidwell Reference Bidwell and Bidwell2008, 140). The indications that missile troops in general and slingers in particular were sometimes associated with towers in Britain, the Netherlands, and – if the extra towers along the rampart at Burlafingen are counted – Germany are interesting. Evidence for projectiles, though, has only been found at a minority of Wall outposts (see Allason-Jones Reference Allason-Jones and Coulston1988), although how many early excavators would have reported the presence of a handful of naturally rounded pebbles is an open question. The skilful use of such missiles could certainly have helped curb unauthorised attempts to slip across the curtain near turrets (Bidwell Reference Bidwell and Bidwell2008, 140).
The additional tower in the Peel Gap probably offers a glimpse of the nature of the problem that outpost garrisons faced in the central sector. If necessary, a much larger installation could have been constructed here, so picking the smallest option available would fit with a desire to block attempts to slip across the curtain by small groups (Symonds Reference Symonds, Collins and Symonds2013, 59). Naturally, such small-scale incursions would not pose a threat to the Roman army, but they could bring disruption to settlements south of the Wall. The late addition of the Peel Gap tower to the frontier system makes it a strong contender for a military response to attempts to evade the controls Hadrian’s Wall imposed. An extra tower was not considered necessary when either the Broad Wall foundation was laid or the Narrow Wall was raised across the Gap. It was only after the Narrow Wall was standing above its surviving height that a tower was constructed against it. Whether stationing missile troops within it was another late refinement is hard to say, but both Narrow turrets 44b and 45b seem better situated for surveillance than using slingers, archers, or a ballista to block potential crossing points.
Although the Peel Gap tower is potentially the last Hadrianic outpost to be constructed on the Wall, a further example of the ‘Peel Gap mentality’ may occur to the east of Housesteads fort. A stretch of Narrow Wall sealing the northern mouth of the Knag Burn gap was demolished so that a passageway flanked by two guard chambers could be inserted (Fig. 35). Although the impetus for this revision may well be related to the neighbouring fort, the addition of a passageway draws attention to the failure of the milecastle system to provide a gate that does not lie on the crags in Wall miles 35, 36, and 37, while milecastles 33 and 34 opened onto a bog. Nineteenth-century clearance of the Knag Burn gate revealed fourth-century coins, and so this portal is normally assumed to be a late feature. It has also been suggested, however, that the north fort gate went out of use in the late second century and was superseded by the Knag Burn passageway (Breeze Reference Breeze2006, 232). As a small structure that both post-dates the Narrow Wall and rectifies a topographical anomaly created by the regular spacing system, the Knag Burn gate offers a parallel to the Peel Gap tower. On this basis, it is conceivable that the gate is a second-century, rather than fourth-century, refinement. If so, the frontier was in effect gradually reverting towards established Roman military norms for outpost use.
The Cumbrian Coast
The western terminus of the Wall curtain lay a short distance west of Bowness-on-Solway. This modest promontory dominating the Solway channel was ultimately employed as a fort platform, but it was probably originally the site of milecastle 80. It is generally accepted that the decision to end the running barrier was determined by the lowest Solway ford lying at Bowness (Collingwood Reference Collingwood1929, 143). The cessation of the curtain does not mark the end of the Hadrianic frontier system, however. Instead, an outpost cordon extended to the west and then south, shadowing the coastline for at least 35km. Sometimes termed the ‘western extension’ of Hadrian’s Wall, this stretch of frontier presents an illuminating opportunity to assess how the milecastle and turret chain was tailored to a coastal context.
Although the Cumbrian system eschews the three linear barriers that characterise Hadrian’s Wall – namely the curtain, ditch, and Vallum – this presumably acknowledges that the Solway presented a far more substantial obstacle. Despite this concession to the terrain, the regular sequence of outposts, referred to in this context as milefortlets and towers, continued along the Cumbrian coastline. Given that there was no linear barrier the milefortlets could permit passage though (Hodgson Reference Hodgson and Visy2005b, 184), such an approach is only really explicable if the proximity of the posts was intended to restrict opportunities for infiltration. Although there are substantial gaps in the system, perhaps attributable to erosion or a failure to even complete the cordon, the known distribution of sites has been taken to imply that the spacing system was even more tightly regimented along the coastline. Rather than adopting the ‘long’ and ‘short’ Wall miles employed on the curtain, Richard Bellhouse, the doyenne of the coastal frontier, believed that for most of the cordon’s course the maximum spacing variation was 5m. On this basis, he argued that individual installation locations are ‘as meaningful as if applied to one stake in a fence’ (Bellhouse Reference Bellhouse1989, 40). Demonstrable deviations from precisely regular intervals do occur, though.
Milefortlet 21 is widely regarded as epitomising the inadequacies of the spacing system, as it occupies an awkward plot on the southern flank of Swarthy Hill, only a short distance from a superior vantage at the summit. Nevertheless, this milefortlet had been shifted 70m from its measured location (Turnbull Reference Turnbull1998, 63), raising it out of a marsh and gifting it a sweeping view over the southern arc of Allonby Bay. The existence of at least one, and possibly two further spacing deviations between milefortlets 17 and 23 indicates that long and short ‘miles’ did occur along the coast (Daniels Reference Daniels1990, 405). Perhaps the clearest example of spacing flexibility occurs immediately adjacent to the curtain terminus. Milefortlet 1 lies 1,676m – well over a Roman mile – from the probable site of milecastle 80 (Potter Reference Potter1977, 149). Although the land lies softly in the vicinity of milefortlet 1, the installation occupies a shelf of higher ground near the apex of a shallow bay, allowing it to dominate that stretch of coast. Such flexibility aside, though, it is remarkable that the outpost cordon was simply extended along the coastline without a more substantial revision to the format. Few of these installations appear to have been reoccupied after the Hadrianic period, and this short lifespan is an apt indictment of an ideology that was indifferent to the distinct demands of controlling a land and coastal border.
The Purpose of the Hadrianic System
How long it took to complete Hadrian’s Wall is unknown, but the most easterly section of the Turf Wall appears to have been rebuilt in stone before the emperor died in AD 138. By then, what started life as a surveillance and anti-raiding screen had been adapted by the fort decision to create ‘a springboard for forward, preventive or punitive, action’ (Graafstal Reference Graafstal2012, 161; Breeze Reference Breeze2014a, 64). This effectively enhanced a capability for what has been termed ‘forward defence’ (Luttwak Reference Luttwak2016, 156), whereby threats were neutralised beyond the border to prevent disruption to Roman territory. Despite this major revision, the milecastle and turret cordon was still completed and indeed refined during the Narrow Wall phase of construction. The combination of a significant new dimension to the capabilities available directly on the Wall line with a heightened desire to ensure that the outposts were set within the landscape to maximum effect testifies to a concerted, if belated, attempt to derive maximum advantage from the frontier works. An ability both to conduct forward defence beyond the border and to minimise low-intensity infiltration across it is carefully catered to by this new, improved frontier concept, implying a truly dual function. The lack of discrimination in garrison size between milecastles with or without north gateways implies that these portals were not routinely used to ease civilian transit. Instead, such access was probably only permitted where the major roads crossed the frontier.
As we have seen, the fort decision was accompanied by significant changes to the fabric of Hadrian’s Wall. It is widely accepted that the eventual deployment of the pre-eminent auxiliary unit in Britain, the ala Petriana, at Stanwix indicates that the frontier’s assault capability was ultimately focused on the highway north into western Scotland. The priority for efforts to supervise the Wall curtain itself has received less attention, but one short stretch of the frontier zone in the central sector is identifiable as a consistent focus of activity and innovation: the gap between the Tipalt Burn and the Irthing (Symonds Reference Symonds2017, 39; Fig. 36). Prior to the establishment of Hadrian’s Wall, this stretch was supervised by the fort at Carvoran, and the fortlet at Throp. Further forts and a fortlet shadowed the Irthing as it flowed westwards, while towers were established on both sides of its valley. When work on the mural frontier commenced, the milecastles within the Tipalt-Irthing gap were probably among the first to be completed and manned, and at the very least turrets 48a and 48b are also likely to have been fast-tracked (Hill Reference Hill1997, 42; Symonds Reference Symonds2005, 76; Graafstal Reference Graafstal2012, 150). Construction of the Wall curtain also appears to have been accelerated, while the ditch was unusually substantial (Graafstal Reference Graafstal2012, 145–146). Following the fort decision, turrets 44b and 45b – directly east of the eastern lip of this topographical bottleneck – became the most artfully positioned examples known on the Wall. To the west of the gap, where the northern lip of the Irthing valley lies hard to the south of the murus, a fort was established at Birdoswald. It is the milecastles along this strip, numbers 49–54, that appear to have been increased in size when they were rebuilt in stone.

36 Looking west over the Tipalt–Irthing gap.
While priority construction within the Tipalt–Irthing gap indicates that it was identified as a critical element of the border zone, the sustained innovation along this stretch of frontier could be a response to an unusual level of pressure. This may have been exacerbated by the decision to run the frontier immediately north of the Irthing valley in Wall miles 49–53, which creates a defensive weakness. Even though additional bridges must surely have spanned the Irthing, reinforcement of, retreat by, or even manoeuvring of the Wall garrisons would have been severely impeded by the river. The southern crest of the Irthing valley offered a far stronger and more conventional defensive position, which was exploited by several Stanegate installations. It is probable that the course of Hadrian’s Wall reflects a desire to deny access to the natural corridor created by the Irthing valley.
The juxtaposition of the Tipalt Burn and the Irthing makes control of this gap the key to regulating regional movement. While the Irthing leads west to the Eden, Carlisle, and the coastal plain, the Tipalt Burn flows into the South Tyne, which offers passage both east towards the intensively populated lowlands and south into the Pennines (Symonds Reference Symonds2017, 39). Indeed, the Roman road that leads into the heart of these hills and is now known as the Maiden Way intersects with the Tipalt valley just 1.5 km south of the Wall. In essence, the Tipalt–Irthing gap is a natural junction where passages to both sides of the country open and penetration of the Pennines is possible. Rebuilding the original Turf Wall milecastles 49–54 to unusual size at a time when the fort decision seems to have lessened the importance of many milecastles suggests that existing measures along the length of Wall cut off by the Irthing were found wanting. Critically, though, these revisions imply that local disruption was ordinarily on a scale that could be met by fortlet garrisons. There is, then, every sign that the Tipalt–Irthing gap represented the greatest geographical obstacle to achieving control of north–south movement in the central sector, and that the army understood this and responded accordingly.
One technique to enhance the Wall’s effectiveness as a barrier that has yet to be detected in the Tipalt–Irthing gap is the provision of berm obstacles. These are currently only known to occur in the vicinity of Newcastle, although they have also yet to be sought along many stretches of Hadrian’s Wall. If berm obstacles do prove to be restricted to the eastern sector, they could represent an attempt to tailor the frontier to the human rather than the physical geography. Although the Tipalt–Irthing gap offers the easiest access to the widest number of destinations south of the Wall, on current knowledge the eastern and western sectors of the frontier brought the greatest harm to indigenous interests. This is because these regions were the most densely populated areas divided by the border. In terms of the raw mathematics of frontier control, if there were more people to control, and by default more people whose livelihoods and lifestyles were harmed by the border, it would be sensible to factor that into the design of the Wall and its construction timetable. Indeed, it is possible to advance a logical overall construction scheme for the frontier, with the most heavily populated east and west sectors being closed first, alongside measures to address particularly sensitive areas like the Tipalt–Irthing gap and the North Tyne valley. Control was then incrementally tightened as construction progressed (Symonds and Breeze Reference Symonds and Breeze2016, 12).
It could be conjectured that different pressures were exerted on the eastern, central, and western sectors of Hadrian’s Wall following the commencement of construction work. In the east, a large, settled farming community needed to be controlled, while in the centre, raiding parties seeking to cross the frontier may well have been the greatest concern. In the west, if the Turf Wall really was motivated by local hostility, it is conceivable that an armed response to the imposition of a frontier was judged possible. The hints of a second Hadrianic war suggest that any such fear may have been well grounded. Within this framework, the role of the milecastle and turret cordon appears to have been essentially constant: to prevent infiltration across the frontier curtain by relatively small groups. Even though the regular spacing system was not the most efficient means of achieving this, there is a good chance that the milecastle and turret garrisons proved highly effective.
Despite the effort expended on the Wall during the Hadrianic period, the impetus for a border on the Tyne–Solway isthmus swiftly dissipated after the emperor’s death. His successor Antoninus Pius ordered the army into southern Scotland once more. This advance is traditionally believed to have been accompanied by the removal of the wooden gates in the milecastles and the slighting of the Vallum (see Gillam Reference Gillam1953, 170–172; Birley Reference Birley1961, 124–125). The landscape divided by Hadrian’s Wall lay open once more.
Destabilising the Local Population
Assessing the impact of the frontier on the local population owes a great debt to the seminal work of George Jobey, but the results of developer-funded excavations in the Northumberland coastal plain are increasingly challenging his belief that indigenous settlement prospered under a durable pax Romana. Recent exploration of multiple sites on the eastern coastal plain has revealed a consistent picture of a previously stable Iron Age farming society to the north of the Wall collapsing at around the time it was constructed (Hodgson Reference Hodgson, Hodgson, McKelvey and Muncaster2012). The most prominent settlements on the coastal plain appear to have been set within substantial rectilinear enclosures around 200 BC. Such homesteads are traditionally seen as the residence of a family, or extended kin group, while the evidence for contemporary and more modest open settlement implies that the occupants of the enclosures enjoyed an elevated status within their community. The longevity of these complexes has also prompted suggestions that their occupants derived kudos from ancestral prestige associated with a founder figure.
Rectilinear enclosures occur on the coastal plain at intervals of approximately 1km, and their occupants seem to have practised a mixed arable and pastoral regime. A pre-Roman population of 10,000–15,000 is considered a strong possibility, with this group capable of fielding a host 3,000–4,000 strong (Hodgson Reference Hodgson, Hodgson, McKelvey and Muncaster2012, 208–210). A population density of this magnitude may well have brought the landscape close to its carrying capacity. Reconstructing the demise of this agricultural community is dependent on radiocarbon dates and a few scraps of Roman material culture. Such an assemblage is no basis for certainty, but the picture that is emerging is of a society that disappeared abruptly at the height of its sophistication, most likely during the period from AD 120–140 (Hodgson Reference Hodgson, Hodgson, McKelvey and Muncaster2012, 213–215). What is striking about this date is that it implies the community survived intact after the initial Roman conquest and occupation of the region, probably in the late AD 70s. It was only following the commissioning of a mural barrier that we see, in Hodgson’s words, ‘the end of a densely packed and closely regulated settlement pattern with a highly distinctive architectural tradition, and presumably the collapse of the social network that went with it’ (Hodgson Reference Hodgson, Hodgson, McKelvey and Muncaster2012, 216). The impetus for this oblivion is unknown, but a connection with the new frontier seems probable.
If the elite derived a sense of legitimacy from ancestral claims to the land, then it is easy to see how the army appropriating it could threaten social cohesion. The healthy representation of horses at one site is interesting given the hints that mounted Britons were a nuisance in the early second century (Hodgson Reference Hodgson, Hodgson, McKelvey and Muncaster2012, 208; TV II 164). Depopulation of this region might be attributable to reprisals in the aftermath of the putative second Hadrianic war. Alternative possibilities include the arbitrary clearance of a wide strip north of the Wall by the Roman army, social and economic collapse following severance from the community’s southern markets (Hodgson Reference Hodgson, Hodgson, McKelvey and Muncaster2012, 218–219), or changes in farming patterns contingent on the Roman need for horses (Breeze Reference Breeze and Breeze2014b, 55). One further possibility is that routine Roman pacification techniques played a part. Tacitus notes in his account of Ostorius Scapula’s campaigning in Britain that ‘he prepared to disarm suspect tribes’ (Annals 12, 31). If this policy had been extended to the groups living on the Northumberland coastal plain in the AD 70s, it is conceivable that half a century later their descendants found themselves on the wrong side of a frontier, without sufficient weapons or training to defend themselves. If, on the other hand, the emptying of this landscape was a deliberate military policy, it may have rebounded on them. Hodgson suggests that roaming pastoralists may have subsequently inherited the territory (Hodgson Reference Hodgson, Hodgson, McKelvey and Muncaster2012, 216). Such mobile groups are notoriously hard to regulate.
The Post-Antonine Frontier
This subheading spans a period of 250 years; longer if the continuity of occupation at some sites in the post-Roman period is factored in (see Collins Reference Collins2012). Despite a traditional focus on the Hadrianic period, there is much that can be said about how the frontier evolved over the following centuries, and it is regrettable that there is not more scope to give it the attention it deserves here. A sketch of events, though, provides an outline of the key developments. Preparations to return to Hadrian’s Wall appear to have been underway by AD 158, when an inscription that most likely came from the Wall curtain attests to rebuilding work (RIB 1389; Hodgson Reference Hodgson and Hanson2009b, 192). It is likely that the withdrawal from the Antonine Wall was executed around AD 160 (Hodgson Reference Hodgson and Hanson2009b, 192), and one of the first steps to reinstate Hadrian’s Wall as a viable frontier line must have been to install replacement milecastles gates. This initial reversion to the Hadrianic system was short lived, however, and over the subsequent fifty years the milecastle and turret system appears to have been thoroughly re-evaluated at least twice.
The most substantive changes to the milecastles and turrets in the decades following the return from the Antonine Wall concern the downgrading of the milecastle gateways and demolition of surplus turrets and milecastle gate towers. The first development could be seen as a belated acknowledgement of one of the aftershocks from the fort decision (Hodgson Reference Hodgson and Visy2005b, 184), while the latter has been characterised as ‘probably no more than an adaptation of the structures to meet the real situation’ (Breeze and Dobson Reference Breeze and Dobson2000, 136). The Wall curtain was probably also further narrowed during this period, and it is conceivable that its full height was now considered flexible. A length of this Extra Narrow Wall, featuring a hard white mortar core that is frequently believed to indicate Severan rebuilding, rises to a level top 3.3m above ground level on the western flank of Highshield Crags (Crow Reference Crow1991, 56). This is not far shy of the 3.7m noted by the Venerable Bede as the curtain height in the eighth century (Ecclesiastical History of the English People 1, 12). It is possible that the short stretch of curtain on Highshield Crags survives to its original height, indicating that by the late second century a lower elevation was considered acceptable on terrain that was already raised by the crags (Crow Reference Crow1991, 59). The greatest obstacle to varying curtain height on the crags – a need to align with the doorways that presumably led into the turrets from the wall-walk – would have been eliminated by the turret cull.
Considered as a whole, the processes underway in the later second century represent the most substantial revision of the frontier fabric since the fort decision. Ascertaining which turrets were redundant and which fulfilled a valuable function must have involved a case-by-case assessment of the structures. The central sector – arguably the region least suited to the original surveillance concept – was hardest hit by the exercise, with no turrets between 33b and 41b known to have been retained (Breeze and Dobson Reference Breeze and Dobson2000, 136). Levelling these turrets wholesale seemingly signals the abandonment of the original Hadrianic surveillance system in the central uplands, either because it was redundant, or because it was judged more effective to focus resources on the lowland sectors. It has been noted that the impact of the turret reduction varied, with the surveillance coverage between Great Chesters fort and milecastle 47 only dipping by 9%. That between milecastles 37 and 40 decreased by 34.5% (Foglia Reference Foglia2014, 42), however, and demolishing different numbers of turrets may have adapted discrete lengths of the frontier to local needs. Tellingly, perhaps, both of the Narrow Wall turrets carefully positioned at either end of Walltown Crags survived this assessment. The Peel Gap tower, however, did not, suggesting that the circumstances that led to its insertion had been resolved to the army’s satisfaction. No milecastles were certainly eliminated at this time, although milecastle 22, which lay adjacent to the Portgate where Dere Street crossed the Wall is a strong possibility. Other candidates include the Westgate Road milecastle, and perhaps milecastle 31, beside Carrawburgh fort (Symonds Reference Symonds, Collins and Symonds2013, 64–65).
Although the milecastles emerged from the outpost cull relatively unscathed, it is believed that ‘in the later 2nd century the role of each milecastle was evaluated individually, according to its geographical and tactical position’ (Welfare Reference Welfare2000, 18). In most cases the outcome of this scrutiny was that the gateways were reduced to posterns too narrow to receive wheeled transport, and the earth causeways across the Wall ditch were dug out, effectively isolating the milecastles from the north. This likely reflects curtailed use of the milecastle gates following the return from the Antonine Wall. There are also indications from several milecastles that gate towers were demolished at or around this time (Symonds Reference Symonds, Collins and Symonds2013, 63–65), possibly because elevated observation platforms were no longer judged necessary, because the reduced gateways did not merit this defensive measure, because of maintenance issues, or a combination of all three factors. But neither the reduction in gate width nor the demolition of the turrets seems to have impaired the importance of the milecastles. On the contrary, the third century appears to bring an increase in garrison size, with several sites apparently receiving a full complement of internal buildings for the first time. Perhaps this relates to a conscious decision to revert to the ‘standard’ model for manning fortlets, with the resident garrison comprising both on- and off-duty soldiers, or perhaps a changed security situation made it prudent to have larger groups of soldiers spaced out along the curtain. Further third-century developments within the milecastles are difficult to identify, a situation that is not aided by a conspicuous and unexplained dearth of coins minted between AD 180 and 259.
Divisive Diplomacy
The early third century coincides with Emperor Septimius Severus’s ill-fated Scottish expedition, which came to a premature end when the emperor died at York in AD 211. Military might was not the only instrument of dominion that Rome sent north of the border, however, and in the long term it may not even have been the most disruptive. Fascinating research into the date, intention, and consequences of denarii hoards that were deposited in Scotland away from known Roman military sites may provide a glimpse of imperial diplomacy in action. Combining what is known of the hoards’ chronological range produces a pattern that differs from hoard deposition to the south of Hadrian’s Wall, but tallies with similar caches found beyond the frontiers elsewhere in northern Europe. Such a consistent picture implies that the Scottish hoards should not be viewed as an isolated reaction to events that are unique to Britain, but rather as a consequence of wider Roman diplomatic activity (Hunter Reference Hunter, Hingley and Willis2007, 217–218).
This policy of supplying gifts, subsidies, or bribes to powerful figures or groups north of Hadrian’s Wall appears to commence in the late second century, and drops off sharply prior to the mid third century (Hunter Reference Hunter, Hingley and Willis2007, 215–217). Although the coinage did not travel north alone, with glassware and pottery also used to advance Rome’s interests, the silver coinage has been identified as the most ‘socially disruptive’ (Hunter Reference Hunter, Breeze, Jones and Oltean2015, 264). This is because it artificially stimulated an appetite for a precious metal that was not available locally, making meeting local demand entirely dependent on continued Roman patronage. As the denarii seem to have been carefully targeted to empower some groups, and isolate others, any local figures whose powerbase grew dependent on Rome’s largesse would have been vulnerable when the Empire’s political priorities shifted and the gifts dried up. In practice this did not just happen once, when the denarii hoards disappear from Scotland as a whole, as these deposits seem to be concentrated in different regions during different periods. This pattern implies that some groups would only have been receiving these commodities for a generation or so, potentially creating repeated episodes of disruption. The impact of this meddling has been linked to major social changes discernible in the archaeological record and the emergence of the Picts in the third century (Hunter Reference Hunter, Breeze, Jones and Oltean2015, 264). If so, given the Picts’ infamous enmity with Rome, these diplomatic gifts may be judged to have seriously backfired. The keen interest it implies in local politics, though, and the targeting of resources in varying regions at varying times, could be seen as the diplomatic equivalent of the military’s use of outposts within occupied territory.
Fourth-Century Frontier
Along Hadrian’s Wall, the picture becomes fragmented in the fourth century, although it is certain that the milecastles were not upgraded with bastions to reflect advances in defensive technology. There are also tantalising hints of greater localism at the expense of a cohesive frontier-wide concept of outpost use. A rare example of substantial alteration to the basic milecastle fabric comes from numbers 51 and 52, where the south gates were replaced with monumental masonry orthostats in the late third or early fourth century (Simpson and Richmond Reference Cowen and Richmond1935, 252–256). There is no obvious reason why these two sites should be singled out for this treatment, although it is noticeable that they lie along the exposed stretch of frontier running directly north of the Irthing valley, which received so much special attention.
Elsewhere, the best surviving and published evidence for late internal buildings comes from milecastle 35. The excavators considered the new fourth-century internal buildings to be ‘something of a decline’ and believed that portions of the rampart no longer stood (Haigh and Savage Reference Haigh and Savage1984, 51). Part of the interior was also given over to metalworking, and scrap seems to have been stockpiled at the site for recycling. Metalwork also occurs in appreciable quantities in late levels at milecastle 39 (Jim Crow pers. comm.), raising the possibility that some milecastles found a new role as industrial depots during the twilight of imperial control. Patching tumbled masonry ramparts with turf work and timber in order to keep them serviceable is a Wall fort trope during the late Empire or early post-Roman period (Collins Reference Collins2012, 85–86). Substantial quantities of timber from turrets 44b and 48b suggest that they may have undergone comparable hybridisation. How many of the milecastles and turrets survived until the traditional end date for Roman Britain in AD 410 is currently impossible to say. Among those that did, milecastle 35 may not have been unique for potentially appearing ‘no longer … recognisable’ (Haigh and Savage Reference Haigh and Savage1984, 51).
Intelligent Design?
There is no denying that Hadrian’s Wall embodies a bold vision for frontier control. At its heart lay a revolutionary new approach to achieving close control of movement, namely integrating the fortlets and towers into an idealised spacing system running the length of Hadrian’s Wall and down the Cumbrian coast. Although the Gask Ridge could be viewed as a prototype that signposts this general direction of travel, the extent to which the spacing strictures on Hadrian’s Wall consistently trumped the potential of the landscape was unprecedented. Utilising standardised templates for the milecastles and turrets further eroded the potential for flexibility. If Hadrian did design the frontier, then he stubbornly pursued an ordered, intellectual solution to border control. The concept that he championed marked an absolute break with preceding fortlet use. Never before had such installations been positioned with such casual disregard for local context. This design was also never implemented in its original state, as the fort decision added a significant new dimension to the frontier. The addition of forts to what was most likely originally intended to be a surveillance and anti-raiding screen enhanced the forward defence capability of the frontier (Graafstal Reference Graafstal2012, 161). The sudden need for such an embellishment implies that either the army underestimated the need to intervene north of the Wall, or constructing the frontier materially altered the regional military situation. Either way, by the time Hadrian’s Wall became operational, a legacy of compromises and obsolescent elements was already fossilised in its fabric.
The bruising collision between the spacing system and the central sector terrain seems to have occasioned concern from the start, with both spacing dislocations and the fast-tracking of priority installations used to soften its excesses. Following the fort decision, the drive for uniformity appears to have been relaxed – though certainly not abandoned – and the opportunity to implement more varied designs and garrison more advantageous terrain was seized. This initial concession to the value of tailoring outposts to the local physical and human geography could be construed as a first step towards the Hadrian’s Wall frontier system reverting to established military norms. It was a journey that continued after the return from the Antonine Wall, when a number of turrets, milecastle gateways, and gate towers became casualties of an efficiency drive, which presumably assessed what was really needed along different stretches of the Wall. Despite this rethink, and the evidence for continued, if subtler, refinement in subsequent centuries, overall the milecastles and surviving turrets seem to display an impressive degree of longevity. It is apparent that the greatest period of change discernible among them spans the second and early third centuries. The apparent retention of many installations in a recognisable form for c. 200 years afterwards is probably indicative of the general security situation stabilising. Although only a handful of sites have preserved hard evidence for activity in the final days of Roman Britain, this may reflect both the loss of late levels and the possibility that they were missed during some early excavations. The durable utility of these installations presumably demonstrates that the core belief underpinning them was sound; not the need for a rigid spacing system, but the notion that small, dispersed garrisons offered the surest means to enforce movement controls.
It has been observed that the current fashion in frontier studies is to perceive border landscapes as zones (see Whittaker Reference Whittaker1994). The essential concept is convincing: the fort screen north of Hadrian’s Wall, and the intricate network of forts to its rear would have engendered a distinctive environment both north and south of the linear barriers. Recognising this gradation should not, however, detract from the existence of an artificial line in the landscape where controls on access to or from the Roman province were applied. What little evidence is available points to the milecastle gateways being ordinarily intended to permit military rather than civilian passage, implying that the latter was routinely restricted to the major road crossings (Hodgson Reference Hodgson and Visy2005b, 184). This new arrangement on the isthmus must have created winners and losers, and wrought massive social change. The consequence for the community settled on the Northumberland coastal plain – and doubtless others living in the shadow of the border – appears to have been catastrophic. For those living within the embrace of Hadrian’s Wall, though, there is every indication that the new anti-raiding shield did help kerb disruption emanating from the north. A cessation, or at least reduction in low-intensity disruption is implied by the apparent disappearance of military outposts along the provincial road network between c. AD 160 and the fourth century, with the single exception of Maiden Castle on the Stainmore pass. Rural settlement also underwent a ‘rapid expansion’ in Roman Britain during the second century, while ultimately villas appear to have been constructed within 22km of the Wall, suggesting that its garrisons made a material contribution to advancing the pax Romana (Hodgson Reference Hodgson, Hodgson, McKelvey and Muncaster2012, 216; Smith and Fulford Reference Smith, Fulford, Smith, Allen, Brindle and Fulford2016, 410). Perhaps the author of Hadrian’s biography in the Historia Augusta was not so wide of the mark when he used the word ‘separate’ after all.


