
Introduction
Both the insertion and the removal of ECMO cannulas are key stages of ECMO management. These steps will be referred to as cannulation and decannulation, respectively.
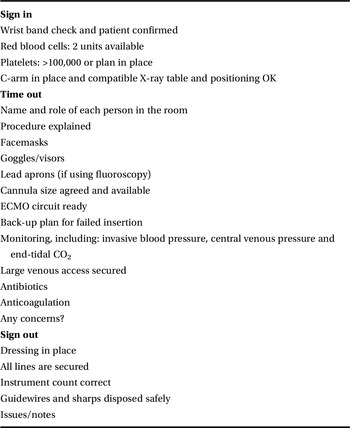
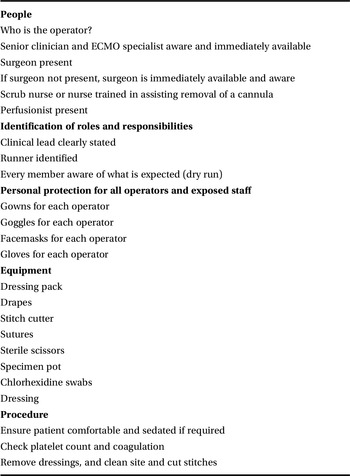
ECMO cannulation must be smoothly done and well planned. Complications can be fatal. Insertion and removal can be supported by checklists, as illustrated in Tables 6.1 and 6.2.
| Sign in |
| Wrist band check and patient confirmed |
| Red blood cells: 2 units available |
| Platelets: >100,000 or plan in place |
| C-arm in place and compatible X-ray table and positioning OK |
| Time out |
| Name and role of each person in the room |
| Procedure explained |
| Facemasks |
| Goggles/visors |
| Lead aprons (if using fluoroscopy) |
| Cannula size agreed and available |
| ECMO circuit ready |
| Back-up plan for failed insertion |
| Monitoring, including: invasive blood pressure, central venous pressure and end-tidal CO2 |
| Large venous access secured |
| Antibiotics |
| Anticoagulation |
| Any concerns? |
| Sign out |
| Dressing in place |
| All lines are secured |
| Instrument count correct |
| Guidewires and sharps disposed safely |
| Issues/notes |
| People |
| Who is the operator? |
| Senior clinician and ECMO specialist aware and immediately available |
| Surgeon present |
| If surgeon not present, surgeon is immediately available and aware |
| Scrub nurse or nurse trained in assisting removal of a cannula |
| Perfusionist present |
| Identification of roles and responsibilities |
| Clinical lead clearly stated |
| Runner identified |
| Every member aware of what is expected (dry run) |
| Personal protection for all operators and exposed staff |
| Gowns for each operator |
| Goggles for each operator |
| Facemasks for each operator |
| Gloves for each operator |
| Equipment |
| Dressing pack |
| Drapes |
| Stitch cutter |
| Sutures |
| Sterile scissors |
| Specimen pot |
| Chlorhexidine swabs |
| Dressing |
| Procedure |
| Ensure patient comfortable and sedated if required |
| Check platelet count and coagulation |
| Remove dressings, and clean site and cut stitches |
Who should insert the cannula?
Peripheral percutaneous cannulation can be done successfully by any clinician trained in the insertion of a large indwelling cannula.
These clinicians should be trained in using strict aseptic technique. They need to have practised the Seldinger technique on multiple occasions and be organized so that the handling of ECMO needles, guidewires, dilators and cannulas is faultless.
They must have a good knowledge of the vascular (and related) anatomy of all vessels they intend to cannulate. Expertise in ultrasound-guided insertion of vascular lines is a key skill, as this will greatly reduce the incidence of complications. A surprising and deleterious consequence of not using an ultrasound is shown in Figure 6.1.

Figure 6.1 A cannula entirely located in the fat in a patient for whom ultrasound was not used to locate the vessel. Surprisingly, the drainage from the haematoma was sufficient to maintain blood flow through the ECMO circuit for at least 1 day.
Clinicians must be aware of the benefits and limitations of using fluoroscopic (X-ray) guidance when inserting a cannula, and be cognisant of the regulations surrounding the use of fluoroscopy in the clinical environment.
While a clinician does not need to be a surgeon to insert an ECMO cannula, vascular and/or cardiothoracic surgeons should be readily available to deal with vascular injuries. The clinician inserting the ECMO cannula must have the knowledge and skill sets to be able to stabilize a patient having suffered a major vascular injury while surgical input is awaited.
Only trained cardiothoracic surgeons should insert cannulas under direct vision in an open chest.
Where should cannulation take place?
The ideal location to insert the ECMO cannula is in the operating theatre, with the patient positioned on an operating table.
An operating room provides plenty of space. Operating department staff are used to sterile procedures and managing critically ill patients and emergencies. Anaesthetic support allows the clinician inserting the cannula to concentrate on the task at hand, while another highly trained professional ensures that the patient is appropriately managed. It is easier to deal with complications in the operating room, particularly when a surgical intervention is required.
Most operating rooms will provide fluoroscopy (X-ray guidance) if required, and specialist centres will usually have ultrasonography and echocardiography readily available.
Operating rooms upgraded with high-end imaging facilities are ideal; these are hybrid catheter laboratory/operating rooms and are set up to allow complex surgery.
It is possible, but not ideal, to cannulate patients while in their bed or on a trolley, and therefore in any location, including the ICU or emergency room. These locations do not offer the same support. For example, space constraints in the ICU might not permit the use of fluoroscopy. This may be due to lack of shielding and protection of other patients and staff, or the standard catheter laboratory may be inconvenient as the C-arm is not ergonomically positioned to provide full access to the patient’s neck.
In the absence of appropriate facilities, the clinician has to weigh up the risk of complications versus the benefits of insertion; this applies mainly for emergency (cardiac arrest) or out-of-hospital insertion. ECMO candidates are usually extremely ill, and many intensive care clinicians claim that these patients are too ill to be transported safely to the operating room. We usually challenge this assumption on the basis of the greater benefit of a safer insertion.
Cannula choice
Main features of a cannula
Cannula choice has to focus on maximizing flow while causing minimal damage to the blood. A generic cannula and some of its features are shown in Figure 6.2.

Figure 6.2 An ECMO cannula.
Materials
Flexibility and consistency of shape are influenced by the material of the cannula.
Flexible cannulas are more difficult to insert but can adjust to the patient’s anatomy and cause less tissue damage. Too flexible a cannula may kink or collapse, impeding the flow or causing turbulence.
Polyurethane is used in the manufacture of most cannula. It has high material strength at room temperature but is more malleable at body temperature.
Wire reinforcement of the cannula walls will reinforce specific components and prevent kinking or collapse. This enables mobilization of the patient. Radio-opaque materials allow confirmation of correct positioning.
Surface coating
Blood interacting with artificial surfaces activates the coagulation and inflammatory cascades. Coating the surface of the cannula is essential to prevent fibrin sheath and thrombus formation. A small thrombus can have a significant effect on flow.
Modern cannulas feature biocompatible coatings that reduce activation of the clotting cascade. Heparin-coated surfaces are most commonly used and result in reduced inflammatory activation.
Alternatives have been proposed but none yet are as efficient as heparin. However, these are valuable in the context of heparin-induced thrombocytopenia.
Length
The cannula length is often determined by the intended circuit: it is configured short in central access as it is directly in the main vessels or cavities, whereas it is long in a peripheral cannula to reach the intended central location, such as the right atrium for drainage or return.
Shape
The shape of the cannula influences its flow characteristics. Changes in cross-section (tapering), a non-circular cross-section, bends or other irregular shapes can have dramatic effects on flow. There are significant differences between arterial and venous cannulas due to the different physiological requirements.
Venous cannulas need to support high enough drainage flows to sustain adequate support with relatively low negative drainage pressures so that the vessel does not collapse. The collapse of the vena cava with increased drainage suction will hinder drainage. This concept makes the venous cannula diameter the limiting factor for overall flow. The large-capacity veins allow larger-diameter venous cannulas to be inserted. Venous cannulas commonly include side holes to improve drainage.
Arterial cannulas are significantly narrower due to the vessel size, and significantly higher pressures have to be applied for adequate flow. The arterial cannulas provide a large resistance within the ECMO circuit and therefore create a pressure drop across it. This high-pressure flow becomes turbulent at the step-wise increase in flow diameter when exiting the cannula into the artery and forms a jet. This arterial return jet in veno-arterial ECMO can cause a stroke when athero-emboli on the arterial wall are loosened. Potential vessel damage is reduced by specific design of the arterial cannula tip into a ‘diffuser tip’, where the return jet widens (and therefore slows down), and by the addition of side holes returning blood into the aorta.
Peripheral arterial cannulas are not only significantly longer but also have a smaller diameter throughout, as the peripheral vessel at the insertion point is narrow. Further tapering would only increase the resistance across the cannula.
Generally, cannulas have transitions in shape or material out of necessity – these are usually smooth, but at times steps might be required in the manufacturing process. These steps form targets for turbulence and stagnation, and therefore both hinder flow and predispose to thrombus formation within the cannula.
Side holes
Venous cannulas often have side holes to facilitate better drainage at lower negative pressures. The side holes have been shown to decrease the amount of overall mechanical stress on blood components. They allow greater drainage flow but create local vortices and turbulence. Computational fluid dynamics has been used to evaluate and quantify these effects and has led to improved side-hole placement.
Double lumen
Double-lumen cannulas combine both drainage and return into one cannula. Here, the geometry of the flow and configuration of side holes is complex, as the two flows and the risk of recirculation have to be considered.
Additional features (insertion/side arms)
Cannulas inserted into peripheral arteries may nearly occlude the vessel volume and can cause downstream ischaemia. To avoid this, arterial reperfusion lines should be incorporated into the cannula. These arterial side arms are significantly narrower than the main cannula and therefore have faster flow. The higher chance of turbulence in this setting also raises the likelihood of thrombus formation and blockage of the reperfusion line.
Cannula comparisons
In order to compare different cannulas and determine the best choice for each situation, pressure flow tables are often used. These tables are usually established experimentally and show the behaviour of the cannulas with varying flow speeds.
The advantage of these tables is that the necessary flow can be estimated and the appropriate cannula chosen before insertion. Most tables published in catalogues show the pressure drop corresponding to a flow between 0 and 5 L/min.
In addition to pressure tables, the M-number allows comparison of different cannulas by calculating an effective resistance for each cannula. For example, a practical application to ECMO cannulas showed that the M-numbers for shorter but narrower arterial cannula were identical to those of longer, wider venous ones. As a result, the short and narrow arterial cannulas were preferentially used for percutaneous cannulation.
Selection of the cannula
Many different cannulas are available from a variety of manufacturers.
Cannulas for central veno-arterial ECMO
Cannulas used during surgery can continue to be used to avoid the need for cannula change when central veno-arterial ECMO is established in an emergency. This requires them to perform both for a longer period of time and in different circumstances.
These cannulas are relatively short and have a large diameter, allowing high maximal flow, but increase the risk of dislodgement or movement when used long term.
Electively inserted ECMO cannulas usually have wire-reinforced walls to prevent kinking. The elective arterial cannulas have a smaller diameter, which increases the pressure drop, but has multiple outlet holes that reduce it.
Both bypass and designated ECMO arterial cannulas have diffuser or curved tips to reduce the damage to the arterial vessel wall.
Central veno-arterial ECMO uses two-stage venous cannulas with drainage holes near the tip in the inferior vena cava and an additional drainage ‘basket’ in the right atrium. This allows a larger diameter along more of the cannula and therefore increased maximal flow. Similarly to the arterial cannulas, the venous cannula walls are reinforced with wire.
One-stage cannulas offer a simpler option; they are easier to insert, but only drain blood from the right atrium.
Cannulas for peripheral veno-arterial ECMO
The vessel size at the insertion site is significantly smaller for an arterial cannula, and the cannula diameter is reduced compared with central ones. This, combined with the increased length, creates a higher pressure drop across the cannula.
A specific feature of peripheral arterial cannulas is the need to add reperfusion lines that aim to prevent leg ischaemia by providing perfusion to the lower limb.
The peripheral venous cannulas are longer than their central counterparts, extending up into the inferior vena cava, and usually have several side holes along their length for improved drainage.
Most of these cannulas have thin wire-reinforced walls to prevent kinking and some are two-stage models that extend into the superior vena cava. The long, extended tip is narrower than the body of the cannula, giving it a tapered shape.
Cannulas for veno-venous ECMO
One of the most recent methods of access for veno-venous ECMO is the use of a double-lumen single cannula, which is inserted into the superior vena cava via the internal jugular vein.
The walls are wire reinforced and have drainage side holes for both the superior vena cava and inferior vena cava.
The return hole needs to be aimed at the tricuspid valve, which requires accurate positioning using fluoroscopy or ultrasound.
One commercially available option for double-lumen cannulas is the Avalon Elite®. It is available in a size range of 13–31 Fr (French scale), with pressure drops of 200 mmHg across the arterial inflow and 60 mmHg across the venous drainage for 4 L/min flow in the 27 Fr cannula.
Another option is the Novaport Twin cannula from Novalung. It is available in three sizes ranging from 18 to 24 Fr with pressure drops of 70 mmHg across the arterial inflow and 30 mmHg across the venous drainage for 2 L/min flow in the 24 Fr cannula.
For single-lumen veno-venous ECMO, normal peripheral venous cannulas are used.
Cannulation technique
The starting point for cannulation should be the identification of the targeted vessel(s) using anatomical landmarks and ultrasound guidance. While most large veins in an adult patient can accommodate a large cannula, measuring the diameters of a target artery (to establish veno-arterial ECMO) can help in selecting the correct cannula size. Some cannulas (i.e. double lumen, drawing from the superior and inferior vena cava and returning in a central position) must always be inserted in the right internal jugular vein. Others can be inserted in any vessel that is large enough.
Aseptic technique should be used throughout. Sterile surgical gowns and gloves should be worn. Facemasks and facial protection protect the staff from blood splashes and must be used.
Two operators are required to insert a cannula, one cannulating and the other assisting. They should have dedicated support to hand them anything required for a smooth insertion.
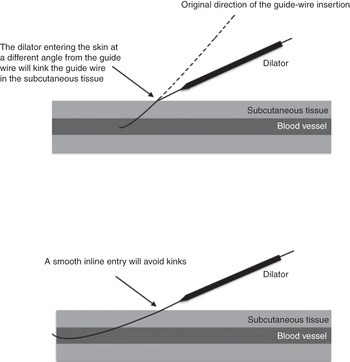
The needle-to-skin approach should be shallow enough to avoid an abrupt change of angulation at the point of entry in the vein (Figure 6.3).

The location of the needle insertion point has to take into account the subsequent position of the cannula and the potential impact on the patient’s mobilization and mobility.
We strongly advocate following the guide-wire progression under fluoroscopy and undertaking repeated checks to ensure that it remains straight and in the correct location. This is, in our view, mandatory if inserting a double-lumen cannula through the jugular vein. Manipulation of the guide wire under fluoroscopy might be required to guide it into the correct location or to avoid looping or the formation of knots.
Dilation of the skin is often required, even with the best-designed cannula. A small skin incision might be required but can cause incessant bleeding after initiation of ECMO, so is best avoided if at all possible.
It is sometimes difficult to know how much force to apply to the cannula during insertion. The absence of movement of the cannula when not caught in skin, muscle or ligament should indicate the need to use a smaller size, as it might be that the vein is too small.
Connection of the cannula to the tubing should ensure that no air is left in the circuit. This requires manual dexterity and coordination between the operator and assistant.
Fixation of the cannula should take as long as, if not longer than, the insertion itself. It should only be done after correct positioning has been confirmed. Correct positioning can only be determined after initiation of ECMO, confirming adequate drainage and return and no obvious recirculation in the case of veno-venous ECMO (see Chapter 4). Fluoroscopy, visual inspection and sometimes ultrasonography will help to achieve this. It is important not to suture the cannula tightly to the skin to prevent skin necrosis and pressure ulcers. Plaster-type fixations can be used successfully in isolation or in combination with standard sutures. Multiple anchorage points are required to prevent inadvertent sudden removal of the cannula.
Reperfusion cannulas
When inserting a veno-arterial ECMO with the return cannula in a peripheral artery (most commonly the femoral), perfusion of the distal part of the vessel must be ensured.
A graft to the side of the vessel could be constructed by a vascular surgeon, allowing blood to flow up and down the vessel. However, this is not always possible due to surgical skill availability. It also entails opening the skin. More importantly, it has been shown to fail on many occasions after several days of support (perhaps due to the high flow immediately at the point of anastomosis).
When the femoral artery has been selected, the best option is to insert a smaller cannula in a distal direction, with the opening of the cannula located below the insertion point of the main cannula (Figure 6.4).

Figure 6.4 (a) Reperfusion cannula inserted in the femoral artery. (b) Reperfusion cannula inserted in the femoral artery, with connection on the reperfusion line with a continuous infusion of heparin.
A connection on the return arm of the ECMO circuit is needed to divert some oxygenated blood to this extra line and perfuse the leg. We have found that a single-lumen 6 Fr catheter can be adequate. One tip is to infuse continuously some heparin down that line to avoid occlusion by a thrombus. This side arm can also be used to infuse a vasodilator such as glyceryl trinitrate to ensure homogenous flow distribution. Note that it is easier to insert the reperfusion cannula before inserting the main cannula, and that ultrasound guidance should be used.
Cannula and circuit configuration
While a single double-lumen cannula can be inserted in the right internal jugular vein in the context of veno-venous ECMO, multiple different configurations are possible for all types of ECMO.
As a general rule, the drainage cannula should be of greater diameter than the return cannula. Increased drainage can be obtained by inserting another cannula (note: changing a cannula to a larger-diameter one is an exercise few would contemplate: it means interrupting the ECMO circuit while the cannula is exchanged, probably resulting in much blood loss and loss of ECMO support). Note that the flow in each cannula must be high enough at all times to minimize the risk of thrombus formation (see Chapter 3). This can be tricky to achieve when several drainage or return cannulas are in place.
In veno-venous ECMO, the tip of the return cannula should be the closest to the right ventricle, to avoid recirculation (see Chapter 4).
Complications of cannulation
At least 1% of ECMO cannulations will result in major vessel or cardiac perforation. Surgical support must be available or this major risk must be weighed against the benefits of instituting ECMO.
Awareness of the possible complications is required, as standard physiological signs may not be present. Major occult haemorrhage must be expected in the case of sudden haemodynamic deterioration after cannulation. Of note, the end-tidal CO2 will decrease in all types of ECMO and is not always a sign of tamponade or air embolism (note: it will be a sign if there is a sudden drop before ECMO has been initiated).
After initiation of ECMO, surgical exploration of the insertion point may open one of the cannula side holes to air, leading to massive haemorrhage or air embolism that may surprise a surgeon not used to dealing with ECMO circuits.
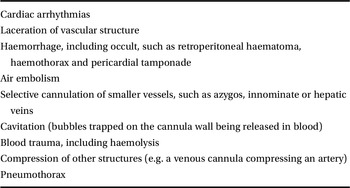
Other complications of cannulation are usually well known to the clinicians practised at inserting large indwelling vascular lines and are listed in Table 6.3.
Table 6.3 List of possible cannulation complications
Removal of ECMO cannulas
Removal of a venous cannula
All venous cannulas can be removed using a simple aseptic technique.
This can be done in an awake and cooperative patient and does not require sedation.
A team is required to ensure that resuscitation measures can be established without delay in case of a problem. The operator requires an assistant. The team needs to plan for possible issues. Protective equipment should be used by all team members, as there is a high risk of blood splash on removing a long indwelling cannula.
Patient positioning is crucial to avoid deterioration during the process of removing the cannula. For example, keeping a patient in the supine position for a long period of time may cause distress and ventilatory issues.
The operator must be aware of the risk of air embolism (which could be entrained into the patient’s own circulation with devastating consequences), and a positive pressure needs to be applied when the cannula is withdrawn.
The area around the venous cannula should be infiltrated with local anaesthetic and a horizontal mattress suture placed in the cannulation wound (Figure 6.5).

Figure 6.5 A mattress suture.
A conscious patient is then asked to perform a Valsalva manoeuvre to prevent air embolism, the tubing is clamped, the cannula is smartly withdrawn by an assistant and the suture is tied. No manual pressure should be applied to the skin, as the lips of the wound will usually close the track and avoid bleeding. Pressure might occlude the vein and lead to the formation of a thrombus.
If the patient is sedated and fully ventilated, positive-pressure ventilation will prevent an air embolism.
Note that the vein can be immediately recannulated for a central line (or a new ECMO cannula if it does not go as planned) via a separate skin puncture.
Vein avulsion has been described, and the operator should evaluate a possible cause of cannula retention rather than use brute force.
Removal of a cannula can be supported by a specific checklist, as shown in Table 6.2.
Care after removal of a cannula
The patient needs to be observed closely. Major haemorrhage remains a possibility.
Key points
Cannulation should ideally happen in the operating room.
Ultrasound and fluoroscopy are indispensable adjuncts.
The benefit of ECMO must outweigh the potential risk of cannulation, even more so if specialist back-up is not readily available.
Fixation should take as long as insertion and is equally important.